Flummoxed by focal lengths? Not sure how or why longer and shorter lenses affect the perspective of your images? Jon Tarrant explains it all.

A recent TV advert for a certain mobile phone chose to extol the phone’s virtues by focusing on the vast number of pixels on its camera chip. Using a school play scenario, the advertisement suggested that Couple A, who owned this particular phone, were able to stay calm and collected at the back of the hall while other couples climbed over each other to get the best view close to the stage. The suggestion was that using a digital zoom was actually better (or at least cooler) than getting close to the action.
I would like to think that the majority of serious photographers saw straight through that naïve approach, perhaps even with the words of seminal war photographer and Magnum founding member Robert Capa echoing from their lips: “If your photographs aren’t good enough, you’re not close enough”.
The difference between these two stances is chalk and cheese. It is easy to show that standing some way back and using a digital or optical zoom to “get closer” is nothing like the same thing as moving closer physically.
In fact even optical and digital zooms aren’t equivalent, because in the latter case the depth of field changes, whereas in the former case it doesn’t. In other words, if you have a 50-150mm zoom lens and you first frame a picture using the 150mm setting, and then take a second picture from the same position with the 50mm and enlarge it to match the first, the two background renderings will be very different.

Image taken at 150mm and resized

Image taken at 50mm and then cropped to match the previous shot – as you can see, the background is significantly sharper
In fact focal length and camera position are both so important, so fundamental, that they are among the key considerations that professional photographers take into account when deciding which lens to use in any given situation.
Relative distances
To understand this effect, let’s start with the definition of perspective. We can describe perspective as the relative appearances of objects at different distances from the photographer.
Imagine you want to take a head-and-shoulders portrait. You could do it at close range using a 50mm lens, or from twice as far away with a 100mm lens, or even from four times the distance using a 200mm lens. If you were using a full-frame camera then the 50mm lens would record a slightly bulging perspective, with the sitter’s nose too prominent to be flattering.
The reason for this “bulge” is relative distance. If, say, the subject’s nose is 45cm away from the camera, then their ears will be about another 15cm further than that – a distance increase of 1/3. This difference is relatively large, as a fraction, so there is a visible bulging effect.
If the same 50mm lens were fitted to an APS-C camera then you would have to step back to fit the same head-and-shoulders composition onto the smaller sensor, and in doing so you would reduce the bulging effect. How? Well, if we assume that the camera is now 90cm from the person, and there is still an additional 15cm between his/her nose and ears, then the extra distance is now down to 1/6 of the total subject-to-camera distance.
Similarly, using the same 50mm lens on a Micro Four Thirds camera to take the same head-and-shoulders portrait would mean stepping back even further, and that in turn would reduce the bulging even more, creating a much more flattering result. If the camera were now 180cm away, the extra distance to the sitter’s ears would be just 1/12 of the total subject-to-camera distance.
Don’t worry too much about the specific figures: all that matters is the idea of perspective, which causes objects to look less rounded when they are seen from further away.

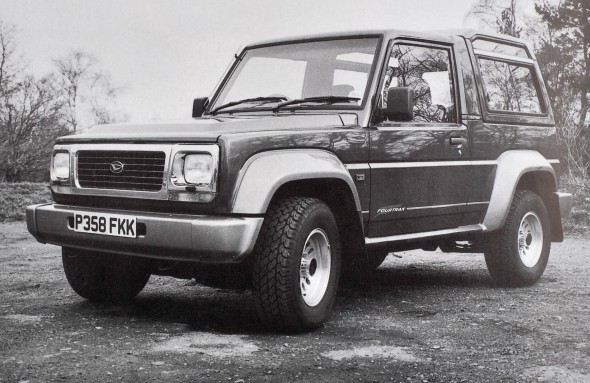
In this photograph taken with a short lens, the features closer to the camera appear larger. This is the “bulge” effect.

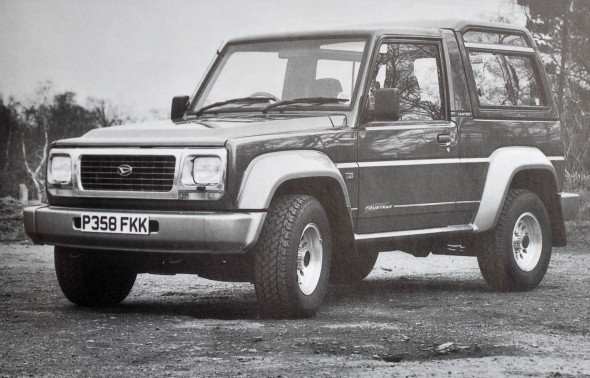
In this image taken with a longer lens from a more distant viewpoint, things look more ordered, and the body of the car appears longer.
Format and focal length
As the above example shows, perspective depends on both the focal length used and the size of the sensor inside the camera. Or rather, these two things determine where you will have to stand to capture any given composition – and where you stand in turn defines the perspective that will appear in the finished picture. Often in professional photographic assignments, especially with still life subjects, the art director will have a sketch that shows how the final photograph has to look and it will be the photographer’s task to identify the correct viewpoint then select the appropriate lens to match the desired layout.
In days of old, the photographer would often create a tracing of the layout and place it over the ground glass of the camera’s viewfinder to act as a template. Much the same approach can be taken nowadays with a digital overlay but in truth experienced photographers who specialise in particular types of work will know exactly which lenses work best to achieve particular visual effects.
This connects back with the scenario at the start of this discussion (remember Couple A and their digital zoom?), so it’s worth saying again: you cannot get the same effect simply by enlarging a smaller image.
Background effects
There are two other factors that come into play when changing the shooting position and fitting a different focal-length lens: depth of field (DOF) and background area.
Depth of field decreases with focal length but increases with subject-to-camera distance. The question is, do these two effects cancel each other out, or is one effect stronger than the other? This is not the place to go into theoretical DOF calculations, so instead I will simply quote some old Bronica information from the days of medium-format film photography that was published in Sidney Ray’s excellent book Applied Photographic Optics.
“50mm lens focused at 5ft has DOF at f/8 from 6.65ft to 4.03ft (2.62ft)”
“150mm lens focused at 15ft has DOF at f/8 from 16.5ft to 13.8ft (2.7ft)”
Clearly, the depth of field is for all intents and purposes the same in both cases, so changing the camera position and lens to gain a better perspective (but exactly the same subject size) need never be at the expense of subject sharpness.
However, the amount of background included in a picture depends heavily on the focal length and camera position: taking a picture from closer up with a shorter focal length will result in a larger background area being visible than when a longer focal length is used from a more distant position.
When the background area is fixed (such as when working in a studio with a standard width of background paper) the maximum compositional area will be limited by how far back the photographer can get in order to use the longest possible focal length.
This might sound counter-intuitive: you could be forgiven for thinking that if you wanted to shoot a full-length portrait instead of head and shoulders then the solution would be to fit a shorter focal-length lens in order to “get more in”, but that would also risk showing the edges of the background paper behind the model. It is often much better to fit a longer focal length and then move further back so that the angle of view covers the full length of the model but doesn’t spill-out too far across the background paper.
So what have we learned?
- Taking pictures from further away creates a more two-dimensional effect that can flatter portrait sitters (but might not be so good for other types of photography, such as automotive).
- Digital and optical zooms give different effects: the former results in greater depth of field because the subject is recorded as smaller in the as-taken picture.
- Depth of field depends on the size of the subject in the viewfinder, which is the same as the combined effect of the subject-to-camera distance and lens focal length.
- The amount of background included in a picture depends on the focal length (angle of view of the lens), so when you want to include more you should choose a shorter focal length. Similarly, if you want to limit the background then choose a longer focal length and move further back.
- Conversely, if you are photographing a truly two-dimensional object that has no perspective, such as a painting, then no depth of field is needed and there is no background context to worry about so you can choose whatever lens best suits the physical arrangement and offers the very best image quality.
About the Author
Jon Tarrant is a journalist and former editor of the British Journal of Photography. His work has been published in a wide range of photographic magazines and he has authored several books on photography.

