With the cost-of-living crisis still looming large and camera prices only seeming to go one way, buying second-hand can be the smart way to save money on your next photographic upgrade. I’m quite thrifty myself and many of my purchases have been second-hand in recent years, though it’s not without its pitfalls. Follow these tips from a second-hand expert bargain hunter to ensure you don’t end up with a lemon.
Check the shutter count
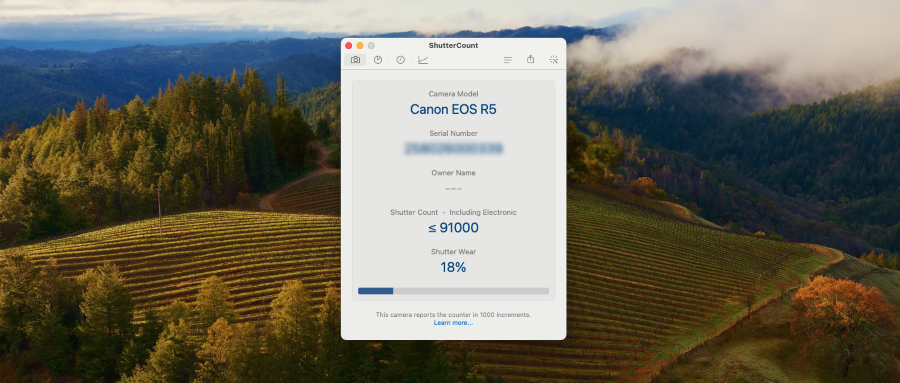
The shutter count is a little bit like the mileage of a car, and in a similar way it gives a good indication of how much a camera has been used. Modern cameras use a combination of mechanical and electronic shutters; while the electronic shutter simply reads out the data on the camera’s sensor, the mechanical shutter is a key moving part inside the camera which only has a certain amount of life to it. Every camera will have its own individual shutter count rating – on my Canon EOS R6 Mark II, it’s 200,000, while on my more professional EOS R5, it’s 500,000. Using the electronic shutter instead won’t add any wear and tear to this figure.
You can check the shutter count of your camera by taking a recent file shot with your camera and uploading it to a website such as www.camerashuttercount.com. This will provide the shutter count and give you an idea of how well the camera has been used – if it’s very high, the camera may have been used professionally and might be really beaten up, even if the outside is in very good condition.
Some cameras, such as my Canon EOS R5, don’t embed the shutter count in the EXIF data, meaning these websites won’t work. Instead you’ll need to download an app (I use Shutter Count) and plug your camera into your computer via a USB cable to read the shutter count information. This may also only be accurate to the nearest 1000th.
Buy from a reputable retailer
A “grey” import is a camera purchased outside of the usual UK channels, meaning it might have come from overseas or a different continent – and consequently comes at an alluringly lower price. While there’s nothing necessarily wrong with these cameras, their provenance t can be a problem if you need to send one off for repair in the future, as it won’t be covered under the standard warranty.
Buying second-hand camera kit from a reputable retailer like Wex gives you some peace of mind. Our team thoroughly inspect the kit beforehand, and there is a strict “No Grey Imports” policy. We also provide a 12-month warranty for extra protection.
Check the battery life
Many cameras have the ability for you to check the battery life. This is usually in a menu called “Battery Health” or similar. This should show you the charging performance – if it’s poor, then it’s likely coming to the end of its life and may not hold a charge as well as it once did when brand-new.
It’s not the end of the world, as batteries are easily replaceable parts. However, many modern cells can cost over £100 so it’s worth factoring in to your budget if you’ll need to pick up a new one, plus any additional spares you may need. Pointing out a battery with poor health can also be a bargaining chip to help negotiate a lower price.
Check lenses for dust, fungus and scratches

Fungus can grow inside of lenses when proper care isn’t taken when storing them, and any mould, fungus, haze or dust can potentially lead to a lack of sharpness and even compromise autofocusing if it’s really bad. Lenses affected in this way will need costly specialist repair to be restored back to their full health, so it’s often best to check thoroughly for these defects first to avoid a hefty repair bill.
A little bit of internal dust is normal and to be expected from a lens several years old. It will also be out of focus in your shots, meaning it’s rarely anything serious to worry about.
Mould, fungus or haze from old lens coatings which have degraded is a more serious issue, and also would hint that the lens has been improperly looked after. Fungus deep inside the lens is difficult to clean and restore yourself, so you will need to send the lenses off for specialist cleaning. I tend to avoid these lenses because mould can spread to your other optics, too. In my experience, lenses with full weather sealing, such as Canon’s L-series, are more resistant to moisture getting inside, and this gives me more confidence when making a second-hand purchase.
Take a good look through the optics – fungus will show up as a spider-web pattern. Also check the front and rear elements for scratches – if you can see the lens in person, huff a little breath onto the optics for clean condensation and wipe it away with a soft microfibre towel. This will let you know if it’s just surface-level grime, or deeper scratches that won’t buff away.
Take test shots to check sharpness

You’ll need to check to make sure your lens is sharp. Of course, very expensive premium lenses are going to be sharper than more budget-friendly ones, that’s not what we’re talking about here.
The lens should be as sharp as the day it left the factory. A dropped lens can knock the glass out of alignment and cause softness. Thoroughly check the exterior for knocks and dings. Take test shots with the lens and zoom in to inspect the sharpness at different aperture values. I’ve personally received brilliant customer service from Wex when buying second-hand lenses in the past and the hassle-free 30-day returns policy has been second to none with lenses that didn’t perform as expected.
Check the aperture and autofocus
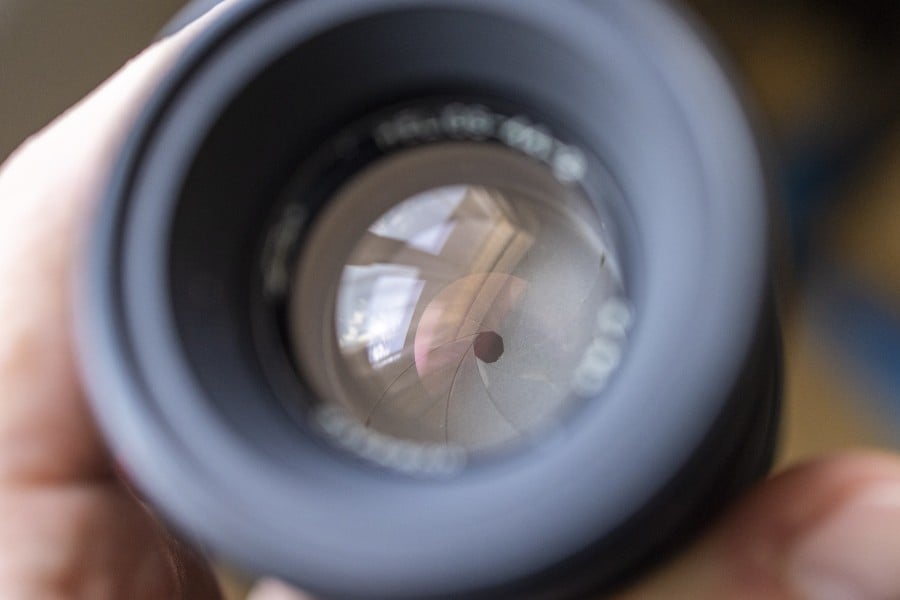
Two key things to check are that the aperture and autofocus are operational, plus other modes such as image stabilisation.
To check the aperture is functional, take pictures with the aperture fully open and closed down in aperture priority mode. Review the images and check that your exposure has changed, but also your depth of field – you can also use the DOF preview button on your camera to check the aperture more closely, too. Inspect for oil on the aperture, particularly with older vintage lenses, as this oil spatter can end up on the optics inside, causing softness and requiring costly professional cleaning to fix.
You’ll also want to check the autofocus motors are working correctly. To do this, set the lens to AF mode and try autofocusing on an object close to the camera and one further away. Repeat this action multiple times to ensure the autofocus is smooth without any unhealthy grinding sounds.
Trending Buying Guides



About the Author
Dan Mold has been writing about photography since 2012, working as a gear reviewer, Photoshop specialist and deputy editor across leading titles including Digital Photo, Digital Photographer, Practical Photography, Digital Camera, Amateur Photographer, EOS Magazine and PhotoPlus: The Canon Magazine.
Sign up for our newsletter today!
- Subscribe for exclusive discounts and special offers
- Receive our monthly content roundups
- Get the latest news and know-how from our experts