
When we think of binoculars, many will conjure a generic image of a person looking for birds with a big pair of binos hanging around their neck. And, whether you are an aspiring “birder”, a wildlife photographer, a sports fanatic or a stargazer - at first, the world of binoculars can be confusing. How do they work? What do the numbers mean? How far can I see with them?
Well, we’ve put this guide together to explain the ins and outs of binoculars - Binoculars 101 - if you will. Have a read to find out all you need to know before making that all-important decision.
What does it all mean?
We know - there’s a lot to cover. There are all sorts of numbers, prisms and coatings that send us into dizzying bemusement. So, let’s start from the start, shall we?
What are binoculars? Binoculars are an optical device that is constructed from an intricate arrangement of lenses and prisms that produce a magnified view of a subject, object or scene. Unlike a telescope or spotting scope, binoculars feature two parallel optical tubes enabling you to look through with both eyes open - maintaining your depth of field and a more lifelike image.
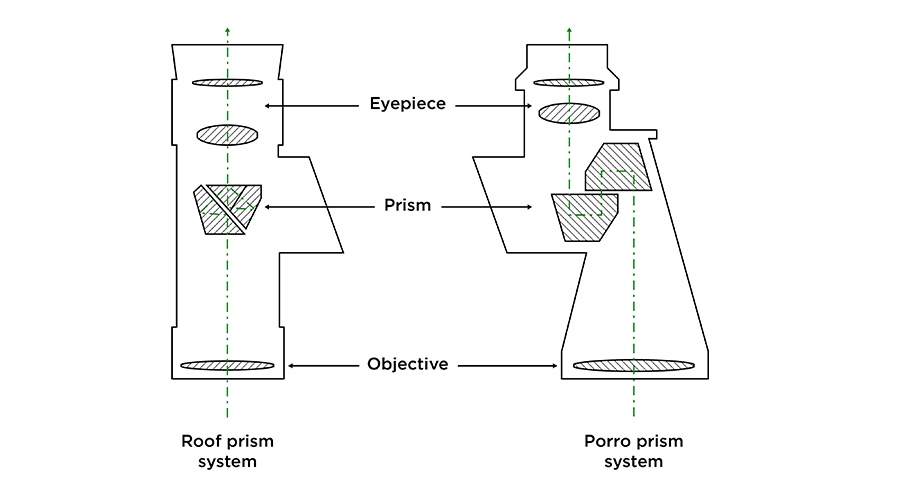
There are two main types of binocular design - Porro Prism binoculars and Roof Prism binoculars. We’ll dive deeper into these later on, but in brief; where they differ is with the layout of the glass prisms within them. It is the prisms that correct the image we see when we look through the binoculars. Without a prism, the image would be upside down and distorted.
Now, another factor that confuses the matter is price. Often there can be enormous price differences for two binoculars that look seemingly identical. But many aspects can affect the price including the prisms used, the quality of the optical elements, lens coatings and other features such as weatherproofing and the chassis material.
So, let’s get into it.
Let’s talk numbers
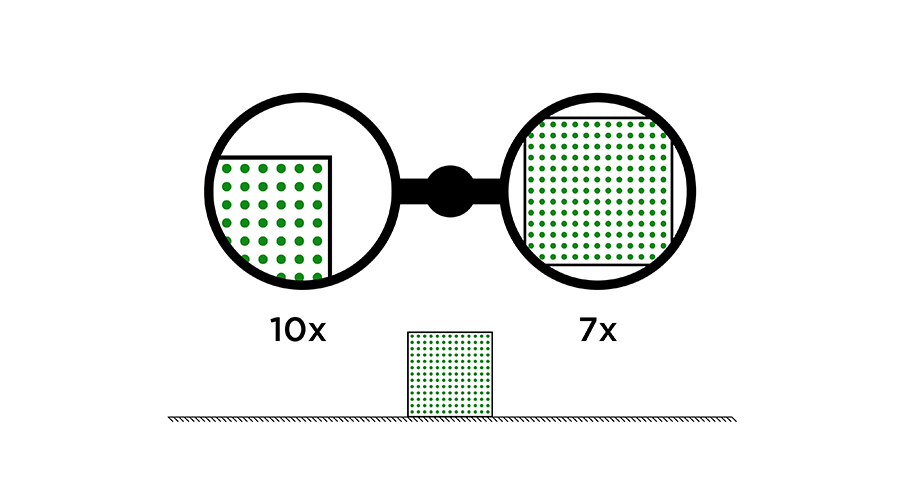
Binoculars are categorised by a set of numbers e.g. 8x32 or 10x42. The first number indicates the magnification or strength and the second is the objective lens diameter. If your use a pair of 8x32 binoculars, the 8 refers to the magnification power. This means the image you will see will appear 8 times closer than that of a naked eye.
Why wouldn’t you want the strong magnification? It depends on your use. Binoculars with high magnification are often larger and heavier and therefore can be cumbersome and difficult to hold steady if used handheld. Equally, for example, if your goal is to have a wider field of view so you can easily track birds in flight - a large magnification may be more difficult to operate. A higher magnification equals a narrower field of view - more on this to come.
The second figure (32, in this case) refers to the diameter of the objective lens in millimetres (the part you don’t look through - unless you’re a kid and making everything look tiny - try it). The objective lens is where light enters the tubes. The larger the diameter, the more light is let in resulting in a brighter, clearer and sharper image.
So, surely you would always go for the biggest diameter? It makes sense, but there’s a caveat. Like the stronger magnifications - the larger the objective lens, the larger the overall weight and size of your binoculars.
As you can see, there are most certainly several things to consider before deciding what will be the best option for you.
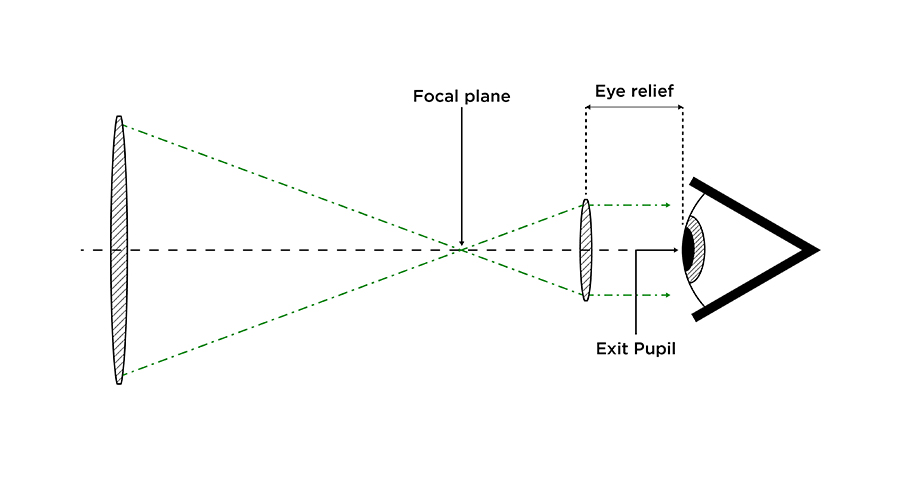
Exit Pupil
The exit pupil is the size of the focused beam of light that hits the eye and relates to how bright the image you see will be in low-light conditions. The bigger the exit pupil number, the brighter the image - this is something that needs to be addressed if you intend to use the binoculars in low-light situations such as dusk or dawn.
To find the exit pupil of a given pair of binoculars, you simply divide the objective lens diameter by the magnification - so, for our pair of 8x32 binos, we will divide 32 by 8, giving us an exit pupil of 4mm. The iris of the human eye is generally dilated by 2-3mm in sunlight and 6-7mm in twilight conditions. So, for general daytime use, you could choose a pair of 10x42 or 8x42 binoculars with an exit pupil diameter of around 5mm.
The exit pupil diameter should always be larger than the pupil of your eye. If the exit pupil diameter is smaller than the pupil of your eye, you won’t be able to see a full image and will look like you’re looking through a straw.
Eye Relief
Eye relief refers to the distance between your pupils and the eyepiece while the entire field of view is visible. If your eyes are too far away, the image will start to vignette and you will not be able to see the entire scene. The shorter the eye relief, the closer your eye needs to be to the binoculars to see the entire image.
This distance differs from brand-to-brand, and bino-to-bino. This poses a problem for those who wear glasses as glasses prevent the binoculars from being brought close to your eye. While adding that extra distance may seem insignificant, it affects image quality and your ability to acquire sharp focus. Fortunately, there are a few workarounds.
Many binoculars have adjustable eyecups that can be twisted in and out to set the ideal distance for individual users. Others are equipped with foldable eyecups that allow you to get closer to the lens. And then, some binoculars feature dioptric adjustments on one of the eyepieces for fine-tuning the focusing system to suit your specific eye prescription.
Field of View
Before buying a pair of binocs, it’s good to know that the design, size and magnification of binoculars affect the image that you will see through them. As we’ve mentioned previously, the higher magnification, the narrower field of view.
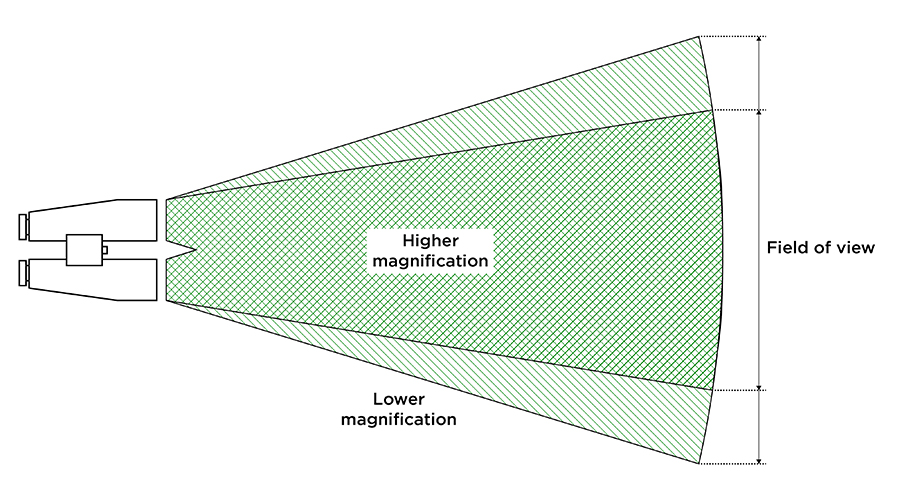
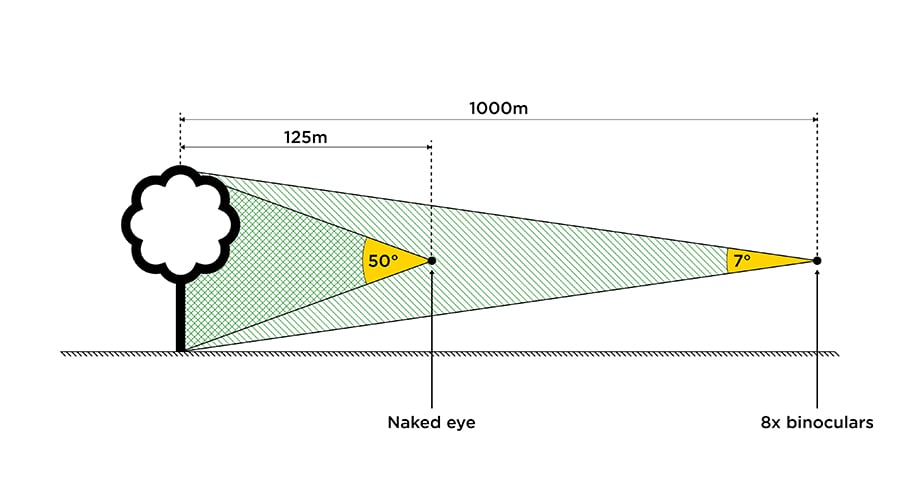
When we say the field of view, we’re referring to the width of the area you can see. It’s usually described in two ways - and while the way people describe it does vary, we’ve adopted “angular field of view” and “linear field of view”.
The angular field of view is the actual angle the binoculars provide - this is usually measured in degrees. The linear field of view refers to the width of the area seen when looking through the binoculars - this is shown in feet at a distance of 1,000 yards, or meters at 1,000 metres.
We can use the angular field of view to calculate the linear field of view. Let’s run some numbers…
1° = 52.5 feet at 1,000 yards
We need to multiply the angular field of view by 52.2.
Take our example pair of 8x32 binoculars - this pair has an angular field of 8°. To work out the linear field of view at 1000 yards, we multiply 8 by 52.5 equalling a linear field of view of 420 ft.
When looking through your choices, remember - a larger number for either the angular or linear field of view means you will see a larger area when looking through. Depending on what you’re planning on using the binos for, a larger field of view will be an ideal view for observing things like moving subjects, birds, wildlife or sports events.
Minimum Focus Distance
Perhaps a bit of an odd one on the surface seeing as we buy binoculars to bring far-away objects into close view. Well, for the most part, this is true. However, there are many users such as wildlife observers who also use their binoculars to magnify plants, flowers and insects - or, birdwatchers, who want to be able to pick out the minute details of their subjects. And, as such, knowing the range in which they will be able to achieve sharp focus between the closest focus distance and infinity is essential!
Generally speaking, as the magnification of binoculars goes up, so does the measure of how close binoculars can focus. If you’re someone who wants to be able to focus on those specific details of your subjects, then you should explore binoculars with a large objective lens (as the extra light helps with detail) and magnification at about 8x (anymore, and your minimum focusing distance will be too far).
Focusing
Most binoculars feature a central focusing system, operated by a main focusing wheel located on the bridge between the two optical tubes. This is the most common style and easiest to operate for any level of user. A feature of this style is a dioptric adjustment dial (like we covered previously) that is often on one or both of the eyepieces that allow you to fine-tune the focus to suit prescription glasses etc. (this dial can be integrated into the central focusing mechanism, and the level of diopter correction differs from brand to brand.)
You may come across binoculars with other focusing systems such as individual focus models that allow you to separately adjust focus for each eyepiece. This is ideal for precision focusing, especially if you know one eye is more short or farsighted than the other. This is a system for solo users - you don’t want your setup to be changed if you’re sharing your binoculars.
Another type you might come across is binoculars which are often called “auto-focus binoculars” or “self-focusing binoculars”. This is confusing and misleading because they don’t focus automatically and they should be referred to as focus-free binoculars. They rely on the flexibility of your eyes to keep the image clear and in focus. Now, a few things to note.
Focus-free binoculars don’t have any focusing mechanisms and therefore, fewer moving parts. This makes them often more lightweight, compact, robust and cheaper. They are also much easier to make fully dust/waterproof and because of all of these reasons, they’re well suited to harsh conditions, observing objects while moving (e.g. hiking) and are well-suited to suddenly appearing subjects (e.g. birdwatching). Sounds good, right?
Well, it should be noted that binoculars like this put a lot of stress on your eyes and can cause discomfort - generally not a problem for children or young adults. But as we age, our eye’s ability to focus slows and because of this, this type of binocular can cause eye strain. Also, binoculars with a fixed focus tend to only focus from 10-12 metres onwards meaning they’re not ideal for everyone - they’re aimed at those who want to view wide open areas.
It’s what’s inside that counts
Porro or Roof
Okay, we’re back to prisms again - as promised. As mentioned before, there are two main types of binocular design - Porro Prism binoculars and Roof Prism binoculars.
Porro prism binoculars feature an offset internal prism to magnify an image. Because of the wider distance between the two object lenses, you’ll be able to see more true-to-life, 3D images compared to the roof prism design. They’re also simple to build and offer decent optical quality at a low, cost-effective price. But as always, there’s a tradeoff. Porro prism binoculars are larger and heavier than roof prism designs, so are not ideal for travelling or any situation really where you want to be able to tuck your binoculars in your bag.
In roof prism binoculars, the optical elements are aligned with one another which in turn, allows for much more compact, lightweight and portable designs. Naturally, roof prism binoculars have become the preferred option because of their portability without sacrificing image quality. And, thanks to modern optical engineering, most roof prisms offer higher image quality and overall performance.
But of course, it’s not as clear-cut as it may seem. As mentioned, Porro prisms are generally cheaper and more simple to build. You may find that you can purchase a pair of porro prism binoculars with better image quality and/or a large objective lens for the same price as a roof prism pair with lesser optical quality.
Optical Elements
The quality of the glass used to produce lenses and prisms is the most important aspect of a decent pair of binoculars (or camera lenses, for that matter). Inferior craftsmanship or materials with imperfections can have a significant effect on the quality of the image you see. Scenes may have strange colour casts, be distorted or you simply will not be able to get your image in focus!
Many binoculars will boast specialised glass such as low dispersion or extra-low dispersion glass that is specifically designed to suppress or eliminate optical distortion or aberrations. The result of this is cleaner, sharper, high-contrast images with true-to-life colour rendition. All of which explains the drastic differences in price tags.
The materials that prisms are made out of hugely impacts the image quality of binoculars. There are three main types of prism material: BaK-4, BK-7 and SK15.
BaK-4 (Baritleichkron, a type of Barium Crown glass) is considered one of the best materials for building prisms due to its high refractive index and lower critical angle resulting in high light transmission and low internal reflections.
BK-7 glass is the most common material used and is generally found in lower-priced binoculars. This type offers excellent light transmission and generally has very few internal imperfections, but does not match the quality of the BaK-4
SK15 glass sits in the middle of BK-4 and BK-7. It features a higher refractive index than both, but the light dispersed or separated when passing through a lens is somewhere in between.
Coatings
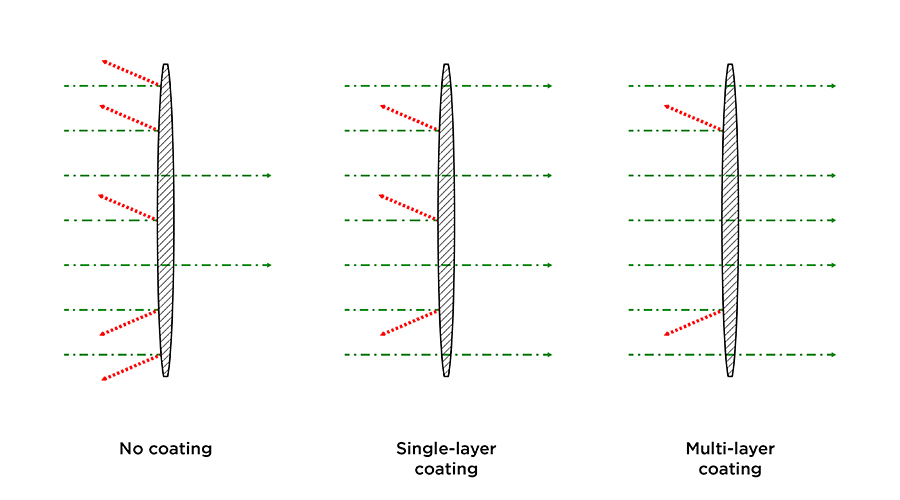
Coatings are specially designed chemical-based films that are applied to both lenses and prisms to reduce glare and reflections, increase light transmission and contrast, make colours more vivid and generally improve image quality. You’ll come across terms like coated, fully-coated, multi-coating and fully multi-coated and phase-coasted which refer to the type of coating used and where the coating is located. Let’s take a look at each type of lens coating:
Coated lenses have at least one thin anti-reflective coating on one or more lens surfaces.
Fully coated lenses have a least one thin anti-reflective coating on both sides of the objective lens and both sides of the lens system.
Multi-coated lenses have as the name suggests, multiple layers of coatings on one or more of the lens surfaces.
Fully multi-coated lenses will have multiple coatings on all lens surfaces. This level of coating is usually associated with high-end optics and is a sign of professional craftsmanship.
Phase coating affects roof prism binoculars. Because of the linear design, light passing through the tube gets reflected on itself for a short distance. When this happens, some light waves that lined up the tube go out of phase causing interference that reduces brightness and sharpness.
Prism Coatings are used in conjunction with lens coating, further increasing light reflection and improving image brightness/contrast. There are many types, of which most will use standard reflective coatings, but some high-end binoculars have specialised dielectric coatings applied to the prisms, that allow more or less 100% of light through the prism and therefore, it produces a brighter, higher contrast image.
Another type of coating is used to correct the effect of phase - a problem only affected by roof prisms. The reason for this is due to the way light moves through the tubes. As light passes through the objective lens, it is split into two separate and independently travelling beams of light. When the two beams are recombined in the eyepiece lens they are slightly out of phase with each other (because one will hit the eyepiece milliseconds before the other) causing poor colour imbalance and colour rendition. The use of a phase coating slows the faster beam to the same speed as the other - bringing them back into phase - so they hit the eyepiece at the same time. This vastly improves colour, contrast and clarity.
Lens and prism coatings are generally a good thing as long as they actually do something. There are many cheaper coatings that, while they may make binoculars look “cool” (e.g. a “cool” colour tint to the objective lens), may not provide any optical benefit.
Binocular Construction
Frame Materials
There are several materials that the frame of a pair of binoculars can be made from. Most popular and most commonly used is aluminium alloy. It’s lightweight, strong, easy to work with and inexpensive. It’s also naturally resistant to corrosion, which is a big plus. However, don’t be drawn in by things like “aircraft-grade” unless a specific grade is mentioned e.g. 6061-T6. Any material used in an aircraft is “aircraft-grade” - you need to look out for the graded materials that have proven strength and corrosion-resistant properties. Generally, if it says aluminium, it will be strong and lightweight.
Magnesium allows is another material used for its high strength-to-weight ratio - it is also often used for camera bodies for this exact reason. The main benefit of magnesium alloy binoculars over aluminium ones is that they will be lighter and therefore, will cause less fatigue if you’re using your binoculars for long periods. They’re also very strong so will withstand the rigours of outdoor use (and/or children dropping them…)
You’ll also come across polycarbonate chassis. This is a material often used for binoculars that are intended for use in extreme temperatures. Unless metals, a polycarbonate frame with not only remain the same temperature in extreme temperatures, but it will not expand/contract when put through fluctuating temperatures. This will prolong the effective use of the binoculars over metal counterparts as over time, temperature changes can misalign the optical elements inside and therefore, make it more difficult to achieve precise focus.
Weather Resistant, Waterproof, Fog Proof
You’d think if you have one, you’d have them all. But this is not the case and determining what each rating means will dictate where/when you can use the binoculars. We’ve split this up to make things a little clearer.
No Rating
Binoculars with no weatherproofing or rating should not be used in the rain, at sea or anywhere where there is moisture. Moisture can find its way into the tubes and when you look through, the heat from your face will cause the moisture to condense and “fog” up the lens, limiting your view and ability to focus - it will also eventually cause rust and corrosion.
Weather Resistant
Weather-resistant binoculars, generally, will use a form of seal to ensure moisture from humidity or mist from getting inside the optical tubes e.g. an O-ring. This is a simple but effective measure that will allow you to use your binoculars in humid, muggy, sticky or midst conditions without causing damage. However, this does not mean they’re fog-proof.
Waterproof
Like the weather-resistant rating, waterproof binoculars have a seal that prevents moisture from getting into the optical tubes. However, it all depends on the grade of the seal, the materials and the craftsmanship. Effective waterproofing allows you to submerge your binoculars for a varying amount of time - some are for limited depths for a limited time, while others are built to military standards and therefore can be submerged for much deeper/longer. However, like the weather-resistant rating, having waterproof seals do not necessarily mean they’re fog proof.
Fog Proof
So, what is “fogging”? Fogging occurs when there is moisture present in the air contained within the binoculars. Just as we see a person wearing glasses open an oven door and get all steamed up, if you take your binoculars from one extreme temperature to another, the air will condensate and cause the lenses to fog.
Fortunately, we live in a world of geniuses who created fog-proof binoculars that use dry, inert gases to prevent fogging. Gases such as nitrogen or argon (or a combination) are pumped into the tubes under pressure, keeping the seals firmly in place and ensuring no moisture can get in. There’s a conversation as to which gas is best e.g. larger molecules are less likely to leak and therefore, prolong water/fog proofing over time, but this isn’t something that needs to be considered from a consumer point of view. The takeaway is, that gas-filled binoculars (whichever inert gas it is) offer effective fog-proofing that is ideal for hiking in high-altitude climates, near open bodies of water, or bird spotting in humid conditions.
Speciality Binoculars
Up until now, we’ve been discussing standard binoculars, but there are several speciality binoculars that we’d like to cover. Now, there is some cross-over with the features but we’ll separate it to make things more simple:
Image-Stabilised Binoculars
Generally, the more powerful binoculars are, the larger and heavier they’ll be, making them more difficult to hold steady and view a sharp, shake-free image. Like a DSLR or mirrorless camera with IBIS (In-Body Image-Stabilisation), image-stabilised binoculars can compensate for user movement, correcting the scene to make a clearer, shake-free image. There are three types of stabilisation used gyroscopic, electronic, and mechanical.
Gyroscopic stabilisation is achieved with internal gyroscopes that provide a reference that is used to move prisms and stabilise the image.
Electronic stabilisation uses small accelerometers to measure any movement which then sends commands to adjust the prisms to counteract that movement.
Mechanical stabilisation uses an array of small counterweights that move to balance the image, counteracting any motion caused by hand-shakes etc.
Are they for everyone? No. But they are often used by those who work at sea where if you were to use standard binoculars, the swaying and movement of the boat can cause a lot of disorientation or nausea. They’re also popular with aviators and search-and-rescue professionals to achieve a shake-free image.
There are also some drawbacks - binoculars with this technology are often heavier and more costly than standard binos, but more importantly, they are powered and therefore require periodic battery changes.
Zoom binoculars
As the name suggests, these binoculars zoom! They offer a variable magnification that allows you to explore a scene or a subject in further detail. Take a pair of zoom binoculars with an 8-24×25 range - you have an 8x magnification at the low end and 24x magnification at the high end. This is usually accessible by a thumb lever or conveniently place while that is in reach without the need to change your grip or take your eyes any from the optics.
It’s good to know that optical paths and the physics of prisms are optimised for a single power. While the ability to zoom in is great for surveying a scene and provides you with greater versatility - the more you zoom in and more away from the optimal magnification, there will be a level of degradation in image brightness, and sharpness and therefore, image quality. Depending on your use, this may or may not be an issue.
Marine
We briefly mentioned these earlier on in this buying guide, but we’ll go into more detail here. Marine binoculars are definitely a speciality, featuring many aspects covered through this piece. They’re often made from that corrosion/temperature resistant polycarbonate mentioned earlier that is lightweight, durable, able to handle saltwater environments, and has the added bonus of generally being buoyant - ideal should you accidentally drop them overboard.
They’re also usually gas-filled for fog/water-proofing, which is vital in this environment. Many marine binoculars are also equipped with integrated digital and analogue compasses as well as featuring image-stabilisation and/or integrated rangefinders. They vary in price but generally, the more bells and whistles, the more expensive they will be.
Night Vision Binoculars
Specialised and often quite expensive, night vision binoculars usually have a low magnification and are equipped with either a light intensifying function to boost ambient light levels or an in-built infra-red lamp to artificially illuminate a scene. This infra-red illumination is invisible to the naked eye but can be seen via the battery-powered sensor in the night-vision binoculars. Some models feature an SD card slot that allows you to capture stills or record videos of the scenes in front of you. Night vision equipment is available in several different styles from binoculars to monoculars, and depending on your use can be a great addition to your kit bag!
Accessories
In many cases, binocular accessories serve to replace lost or broken parts. But we’re going to focus on the parts that will simply make using or carrying your binoculars easier.
Neck Straps - There are a huge number of straps out there to choose from. Adjustable, padded, coloured - you name it. There’s something out there for everyone and every occasion!
Harness - In some cases, the provided neck strap is either not enough or simply not suitable for your excursion. For this, you can explore harnesses that allow you to attach your binos to you over your shoulder, on your back or around your waist. There are all sorts out there that will best suit your activity.
Tripod Adapters & Mounts - The larger the binos, the more cumbersome they are. This can make them more difficult to hold and/or hold steady. Often used in bird hides to provide stability and a steady image, you can use a tripod adapter or mount to attach your binoculars to a tripod/surface. This makes those longer observation sessions much easier.
Tethered caps - Forget losing your all-important objective lens caps. Get some tethered caps to loop over the objective lens end. Simply flip them down and you don’t have to worry about losing them.
Rain Guards - These guards replace the caps that come with your binos. They sit over the eyepieces of the binoculars to protect them from precipitation when being worn around the neck.
Cleaning Kits - We have to keep our binoculars clean and clear of debris to ensure the best possible image. For this, there is a plethora of liquid lens solutions, pens, cloths and cleaners.
Digiscoping Adapters - Perhaps you don’t own a camera and a long lens but you want to snap a shot of a bird, animal or scene that you’ve seen through your binoculars. Look no further than a digiscoping adapter. This adapter allows you to mount your smartphone camera to your binoculars and take pictures of the magnified view!
Have you considered…
We’ve been covering binoculars of all shapes and sizing but perhaps a different type of optic would better suit your needs?
Rangefinders
Rangefinders are battery-operated devices often used in sports such as golf or archery to measure the distance between the view and the subject. While you could use it to observe a scene, it is not the ideal viewer apparatus.
Monoculars
A monocular is essentially half a pair of binoculars and serves the same purpose - magnifying distance objects or scenes. However, while binoculars are used for observing, often at length, monoculars are most commonly used for scanning a scene and identifying target locations etc. However, they’re significantly lighter and smaller than binoculars and may be ideal for those who want to observe wildlife or subjects but can’t afford the space taken up by binos.
Spotting Scopes
Spotting scopes tend to veer into another area of observation but still offer essentially the same result - a magnified view of a scene, object or subject. They’re generally more cumbersome when compared to other optics and usually require a tripod or mounting system. But it all comes down to your intended use - if you’re creating a permanent viewing station or require the highest level of optical quality, a spotting scope could be the option for you.
We like to think we’ve covered a lot within this guide but sometimes you just want the straight facts. Well, here are some of those terms that are essential when it comes to binos!
Glossary
Magnification - This refers to the strength of the binoculars and therefore, how close the object will be. But this should be considered in conjunction with the diameter of the objective lens.
Prisms - Prisms are used to correct the inverted image projected by the objective lens as light passes through.
Porro Prisms - Porro prism binoculars feature an offset internal prism to magnify an image. The light passing through forms a "Z" shape before reaching the eye.
Roof Prisms - A more modern prism design where light passes through in a straight line that allows for more compact binoculars.
Exit Pupil - The exit pupil is the size of the focused beam of light that hits the eye
Eye Relief - This refers to the distance between your pupils and the eyepiece while the entire field of view is visible.
FOV - Field of View refers to the width of the area you can see when the entire image is visible.
Gas-filled - Inert gases such as nitrogen or argon (or a combination) are pumped into the tubes under pressure, keeping the seals firmly in place and ensuring no moisture can get in.
About the Author
Leo White has been part of the Wex Photo Video team since 2018, working across the contact centre, product setup, and now within the editorial and marketing team. Alongside his day-to-day work, he is a writer and editor, helping to shape product copy, articles and wider brand communications. With a BA and MA in Photography, he combines academic study with hands-on experience of photographic equipment and image-making, bringing clarity and practical insight to the way complex ideas are communicated.
The Wex Blog


Sign up for our newsletter today!
- Subscribe for exclusive discounts and special offers
- Receive our monthly content roundups
- Get the latest news and know-how from our experts


