It started innocently enough. My good friend, fellow adventurer and filmmaker Alister Chapman and I were standing on a film set, he in his capacity as camera operator and digital imaging technician, and me in mine as the on-set stills photographer. We’d donned our masks, bumped fists and exchanged how-was-your-lockdown pleasantries. There was a pause. Then:
“Have you SEEN what’s happening in Iceland?”
So in a lot of ways the adventure that followed was Alister’s fault.
The thing that was happening in Iceland was the Reykjanes Peninsula’s first volcano for nearly a millennia – a nascent shield volcano called Geldingadalir, which for several weeks had been erupting spectacularly. At one point a boiling explosion of lava had been visible from Reykjavik, 25 miles away as the crow flies.
Unable to turn down the prospect of a front-row seat to nature at its most explosive, a fortnight later, I was on a plane. How often do you get the chance to be one of the first photographers to see a brand-new volcano make its mark on the planet?
The weather may be bad but don’t worry, the air is also toxic.
What gear to take
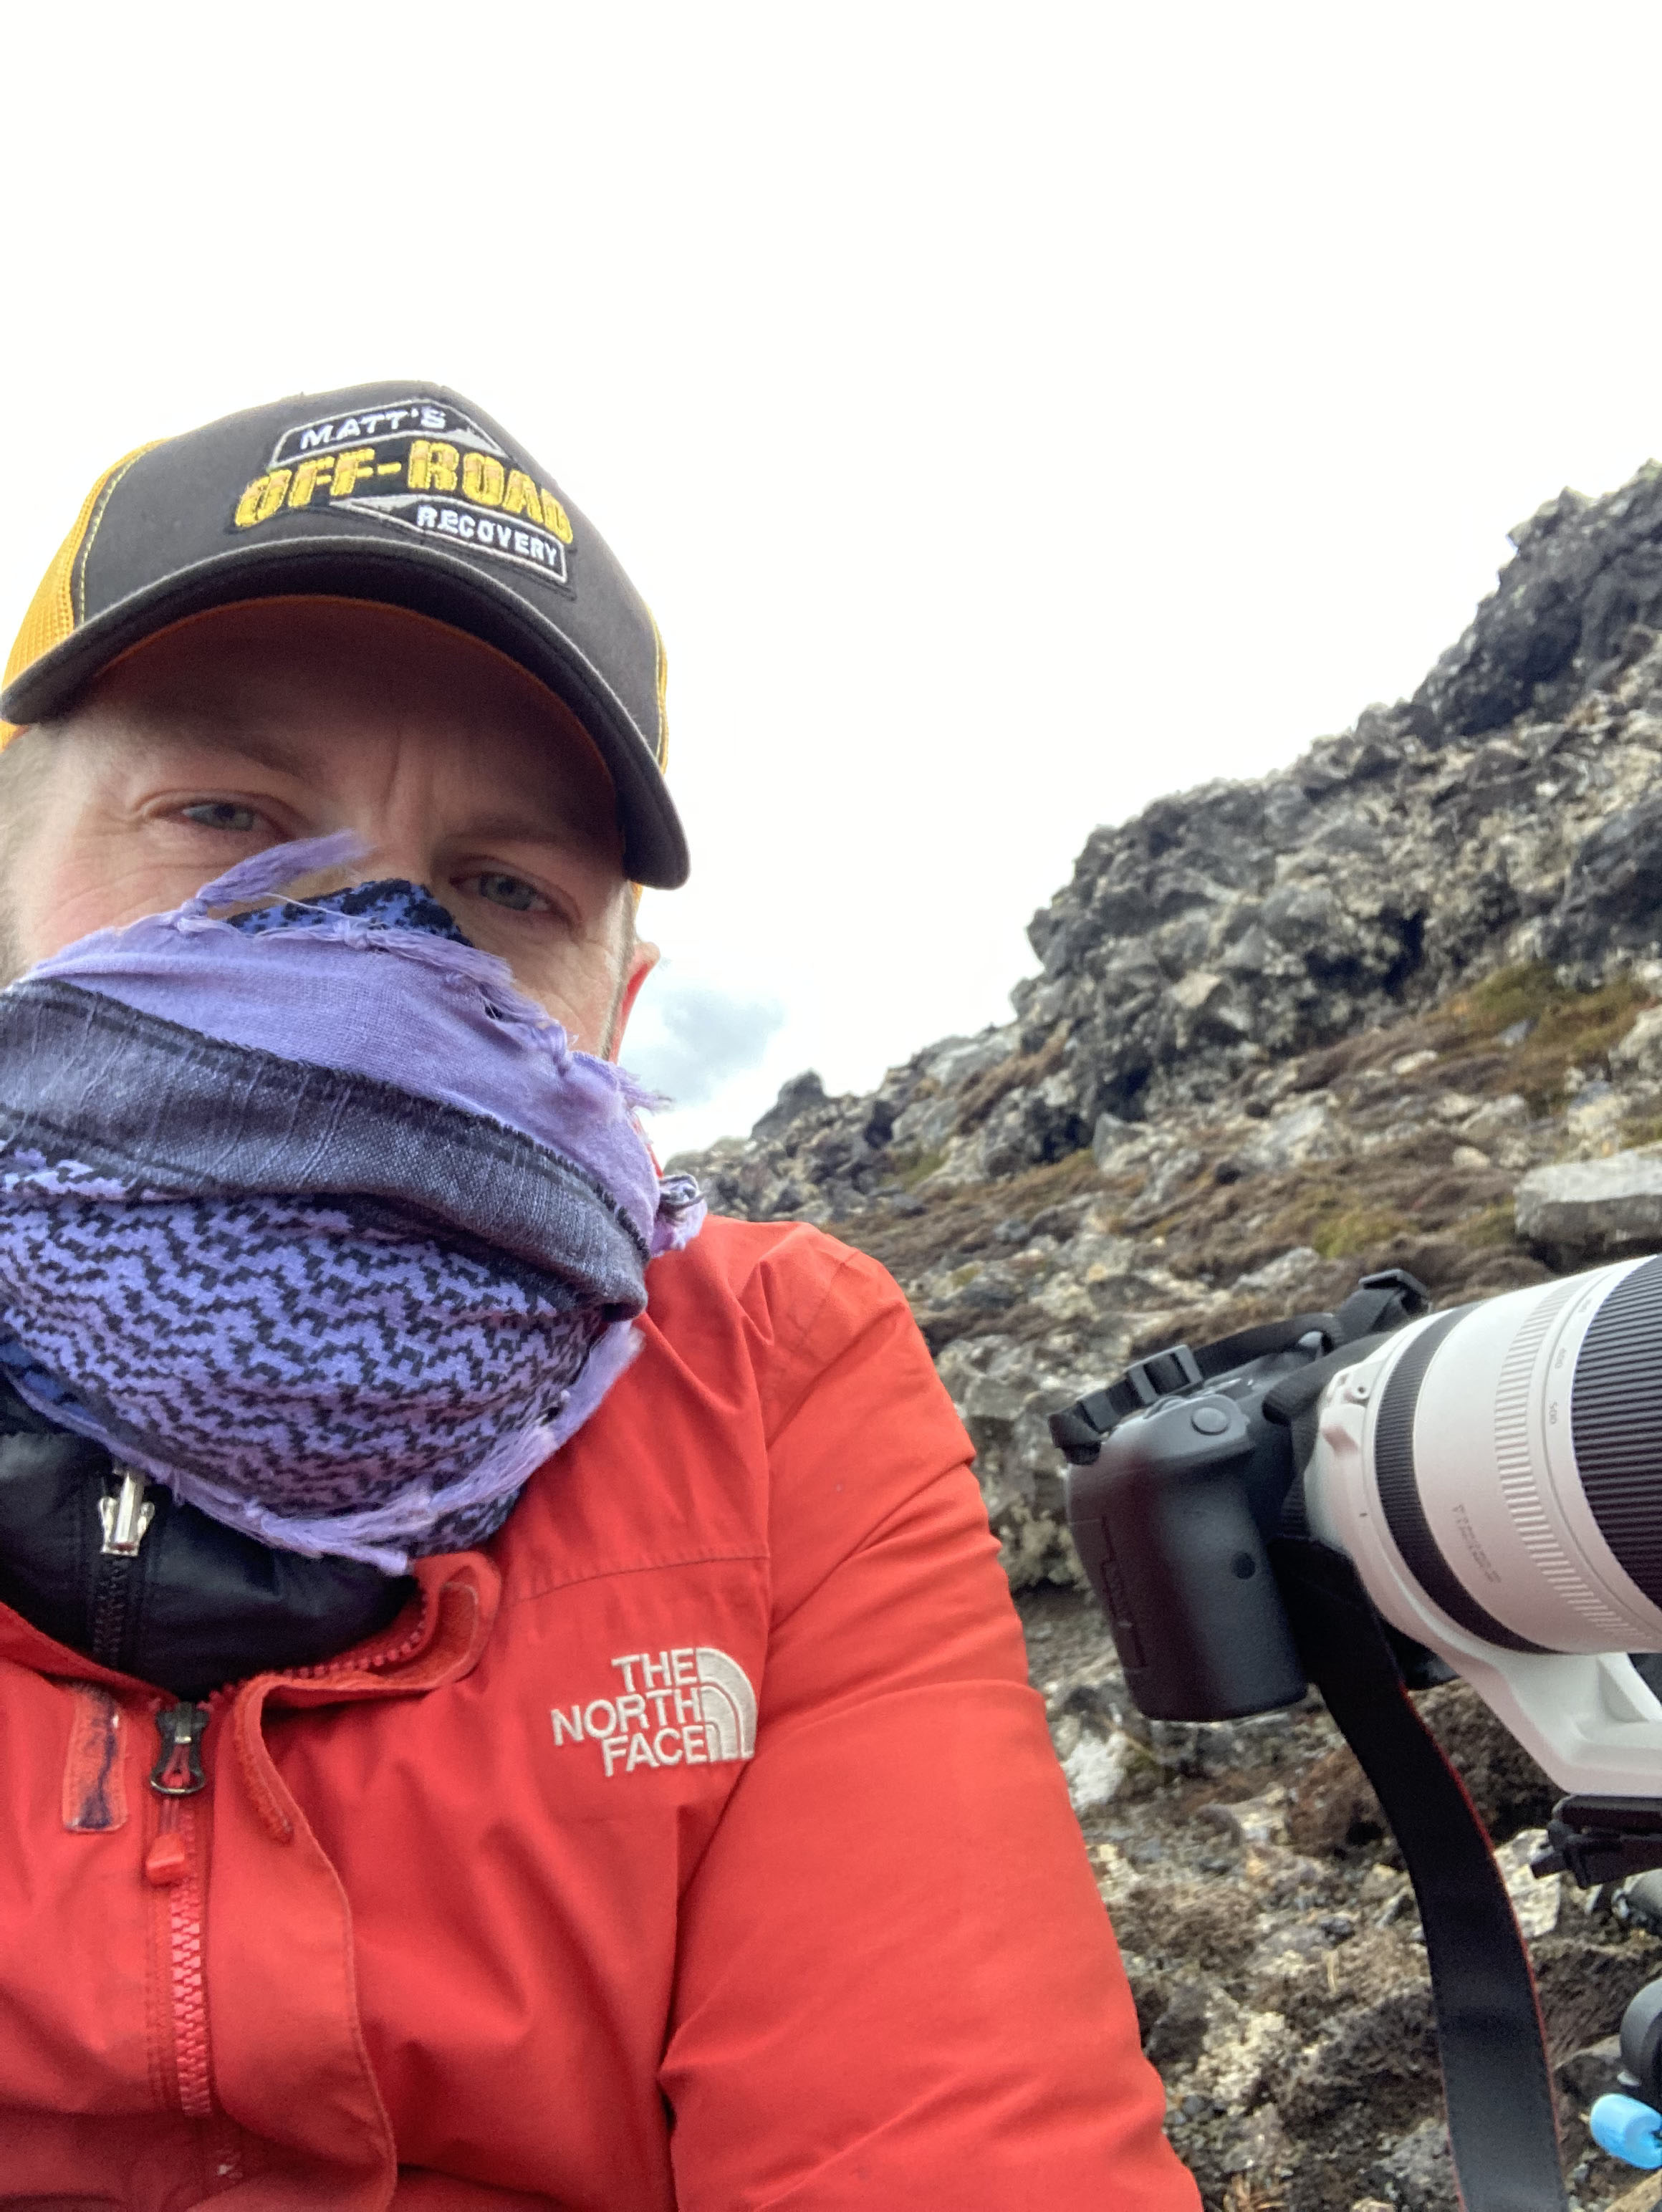
The question of what gear to take was an important one – no-one likes to find themselves perched on the side of an Icelandic mountain with the wrong focal length. There’s also the fact that Iceland is a certified equipment killer – it’s cold, it’s wet, it’s windy and if your gear isn’t weather-sealed to within an inch of its life, the repair bill is going to hurt.
In the end I took my Canon EOS R6 – plenty of dynamic range, 20fps for when the action got tasty and, critically, bulletproof autofocus made it an obvious choice. This was also going to be a good chance to try out its high-framerate video: most of my video work is of the tried-and-true 4K at 25fps variety, meaning the R6’s 100fps Full HD mode had gone relatively untouched until now. My EOS 5D came along as well, just in case, as did a pair of Canon’s 24-105mm f/4L IS lenses, one EF and one RF.
Videos were pouring out of Iceland as well as lava, and from watching them religiously every morning until the day of my departure (allow me to recommend the Reykjavik Grapevine), it was obvious I needed a lens with a bit of reach as well. I umm-ed and ahh-ed about this for a long time – my daily driver for long lens photography is Canon’s amazing EF 500mm f/4L IS II USM. Sharper than an Ian Hislop comeback, with autofocus faster than Max Verstappen and a build like a tank, I’ve used it all over the world. And yet at 3.2kg it’s a monster, better suited for resting on the side of a Land Cruiser than being hiked all over a mountain.
All of these deliberations bought me to the RF 100-500mm F4.5-7.1 L IS USM. My experience with L-series RF lenses has been unceasingly superb, and although the 100-500mm isn’t without its drawbacks (the relatively small f/7.1 aperture at 500mm chief among them), at 1.5kg it weighs half as much as the big 500mm prime. This would clear out some weight that could be used for other stuff.
Getting to the volcano
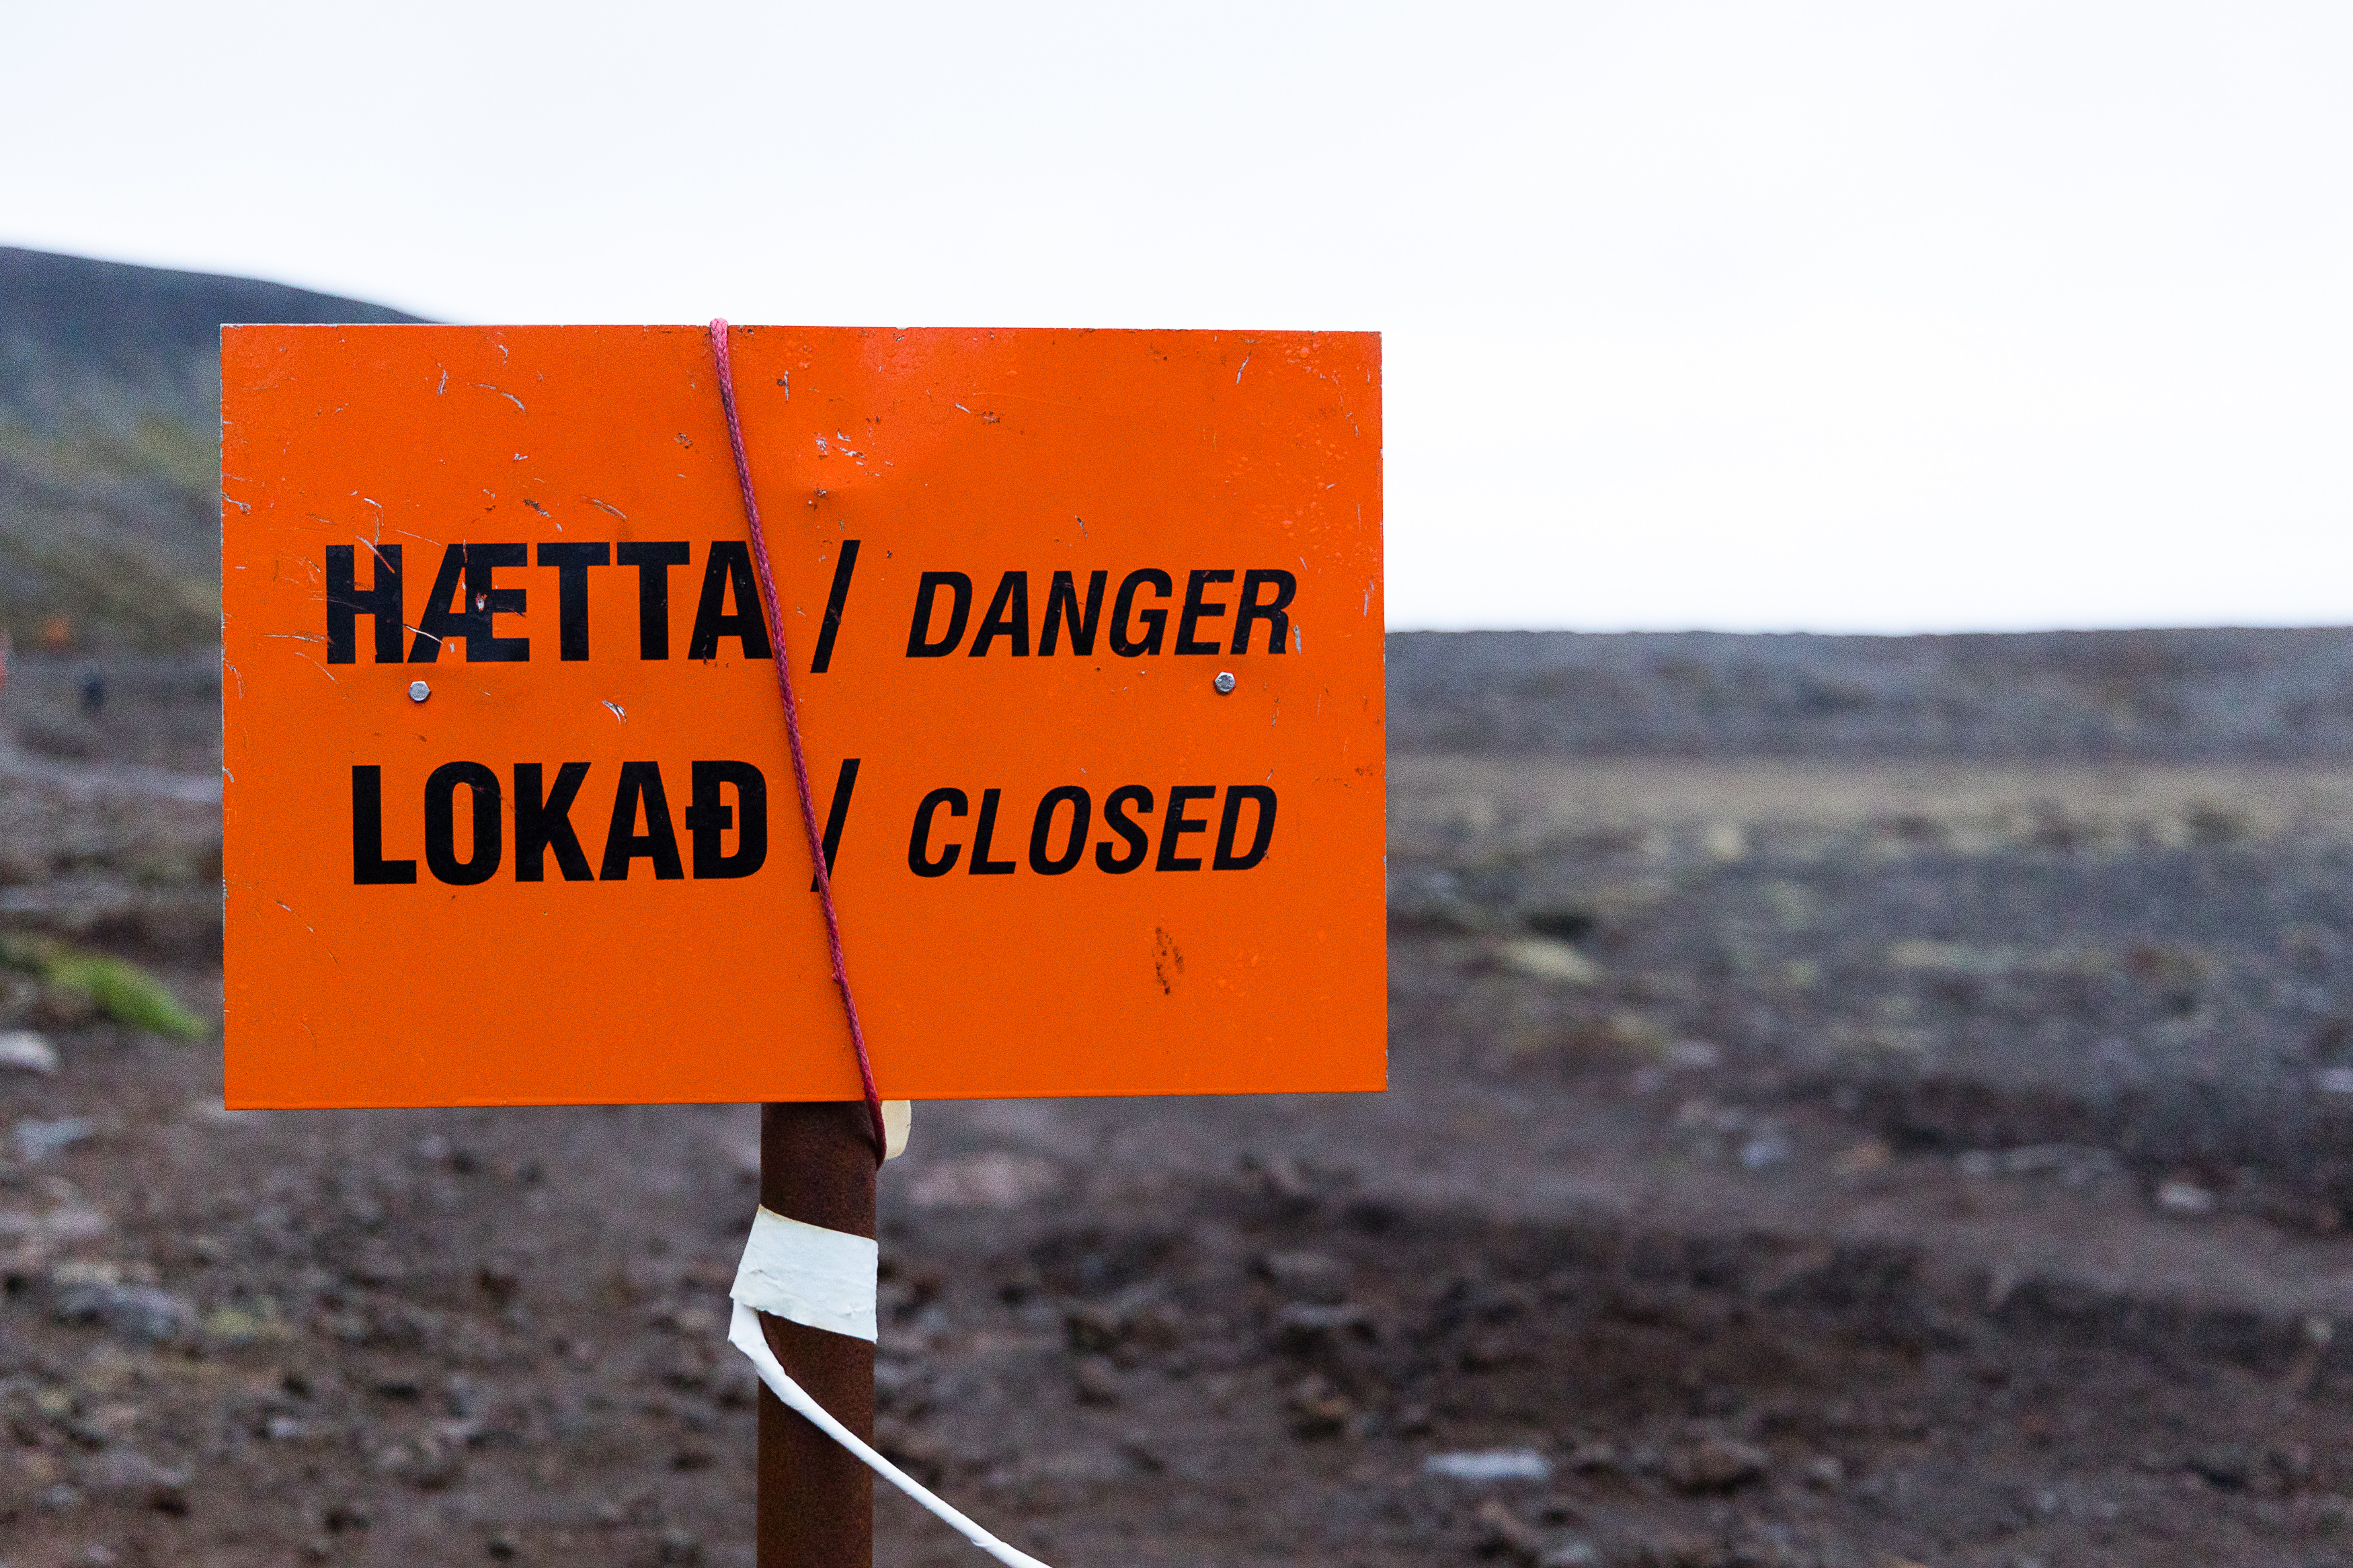
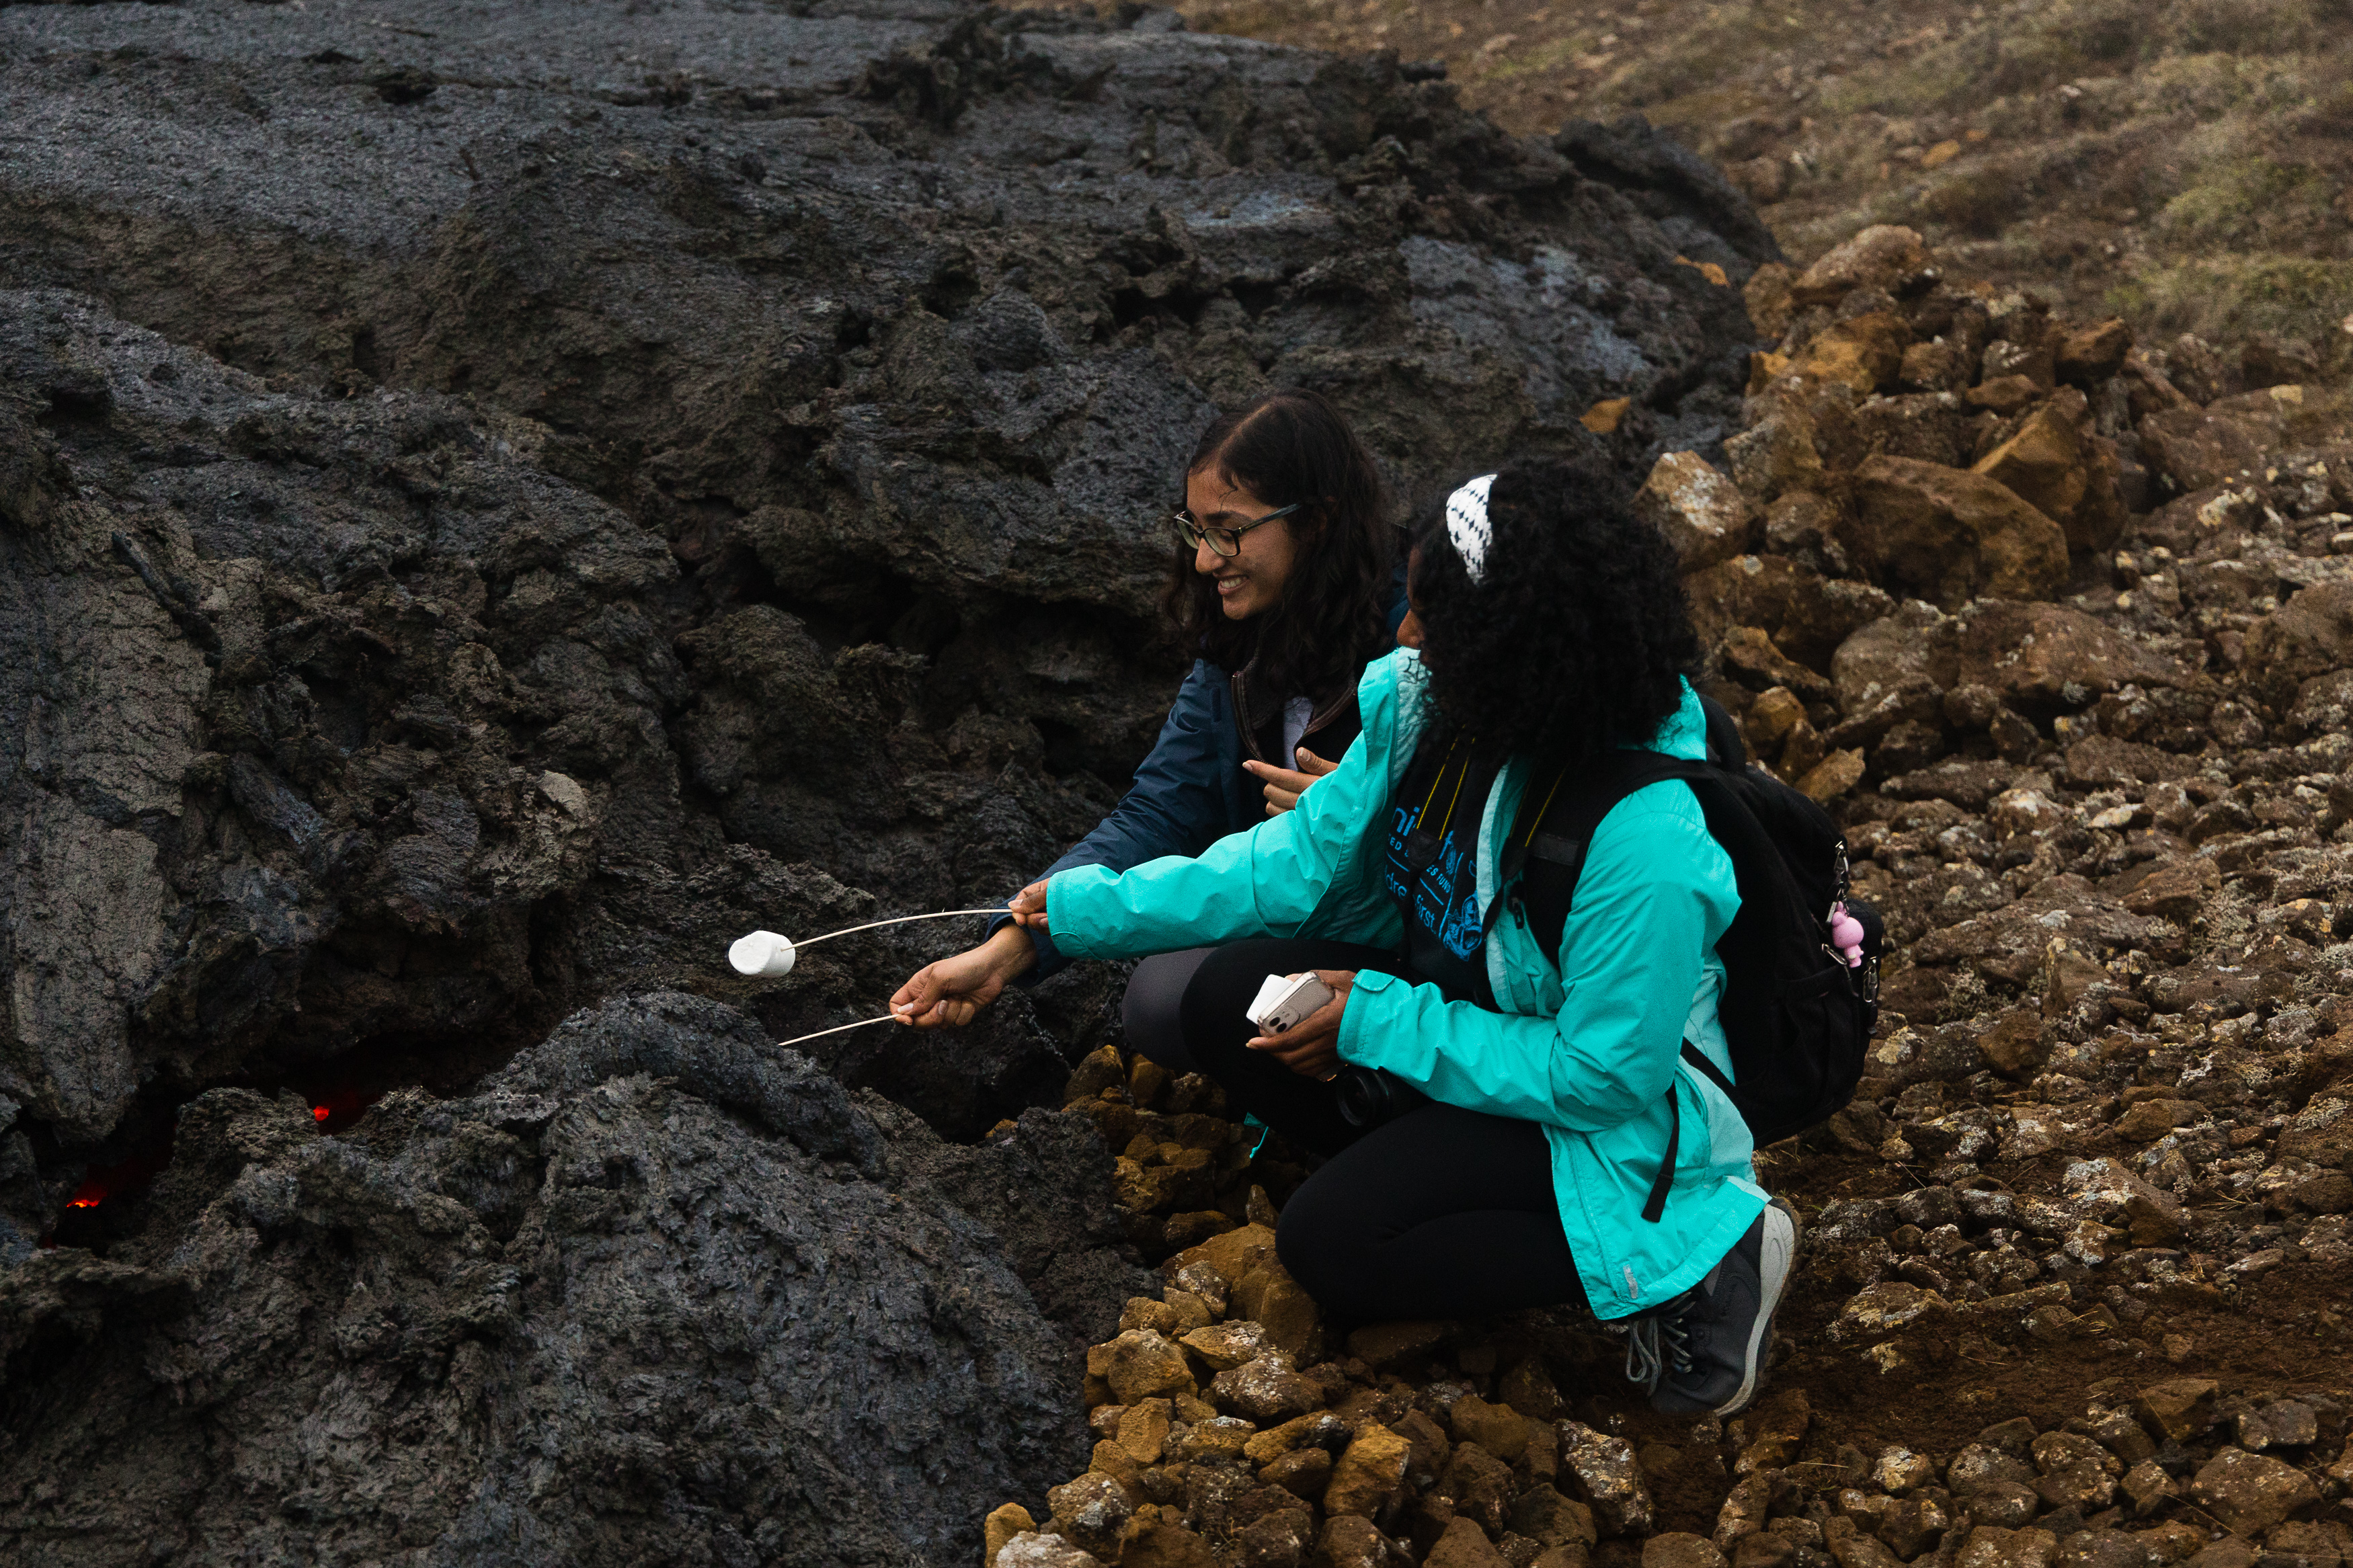
You may end up walking past a few of these.
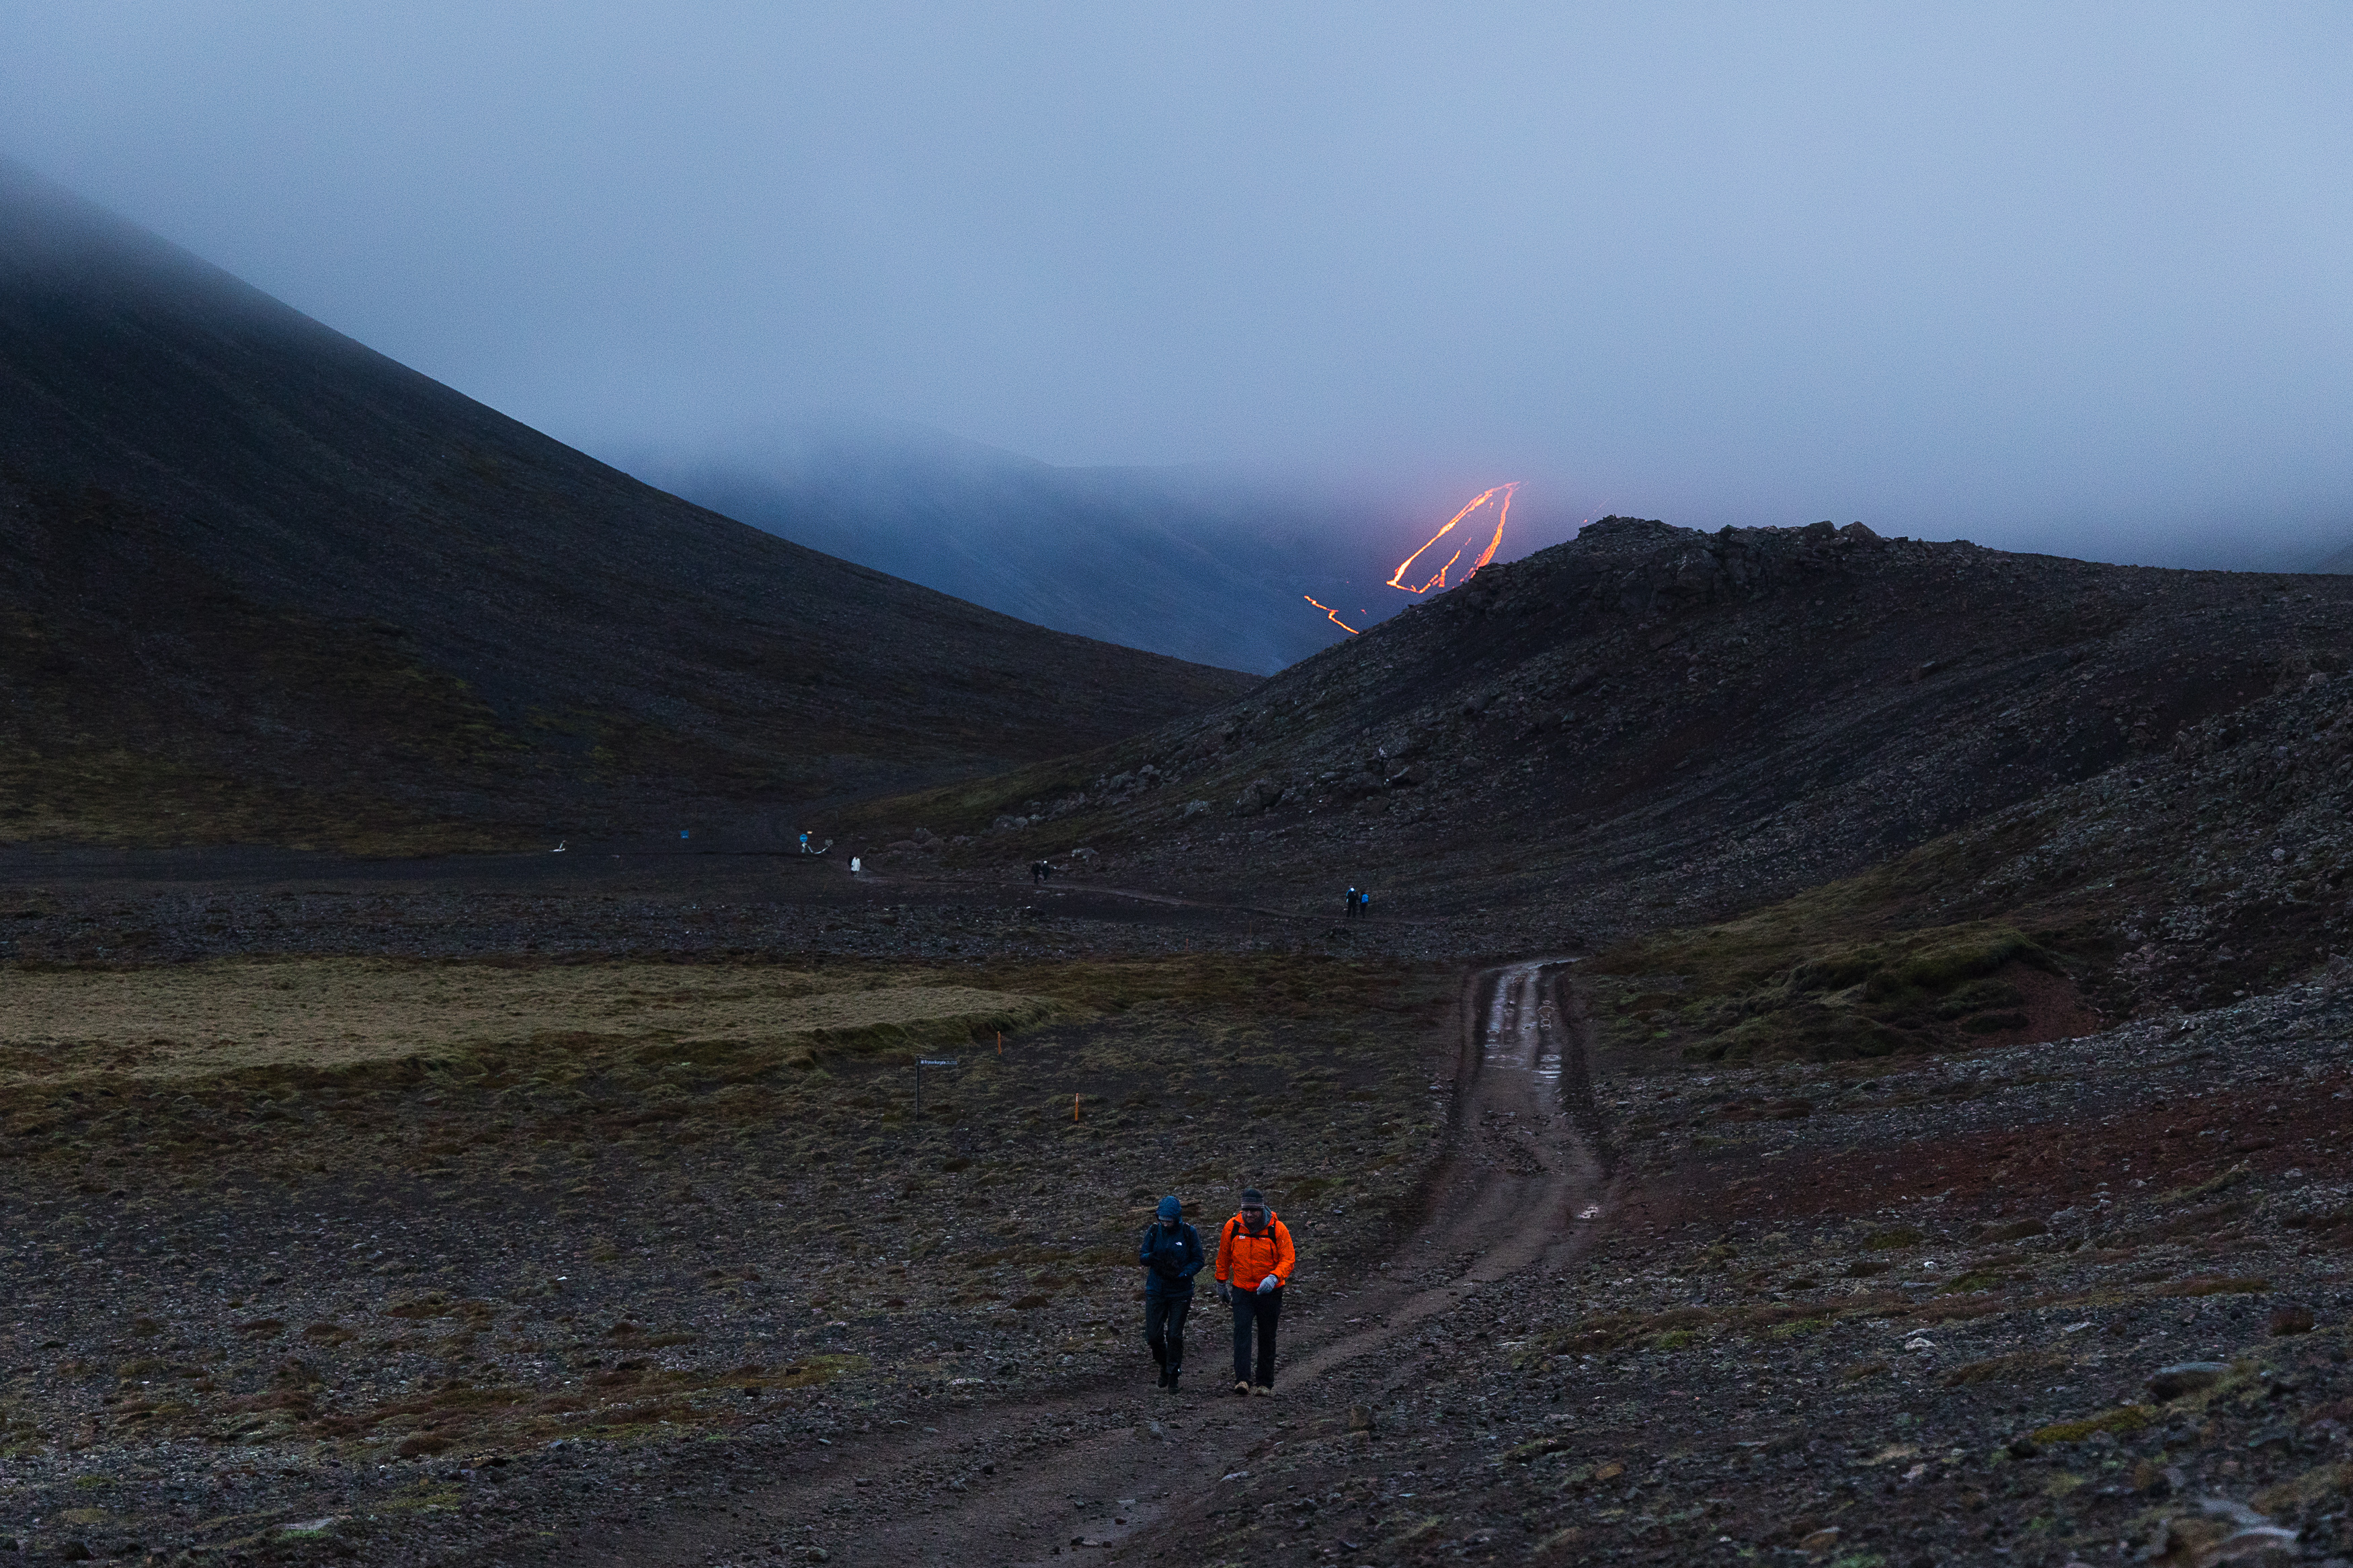
You’ll definitely need other stuff, because the Geldingadalir volcano isn’t something you can shoot from the side of the road. The hike to the crater is a little over two miles, with a fairly dramatic elevation change. It can be pretty difficult. I went five times in four days, and it was different every time.
Day one was fine – a steep climb with kit, but basically all right. Day two was horrendous – driving rain and 30mph winds made the hike like trying to breathe with your head sticking out of a car window. There are a couple of false summits as well – points where it looks like you’re reaching the peak of the climb, only to find some geological joker has hidden another 30m hill behind it. That means carrying camera gear is only part of the story – you need between 500ml and 1 litre of water for every hour of hiking, which adds another roughly 2kg to your kit. Throw in some fruit and Jelly Babies (for emergency morale restoration when you discover your socks are wet) and all that kit adds up.
Walking conditions: not amazing.
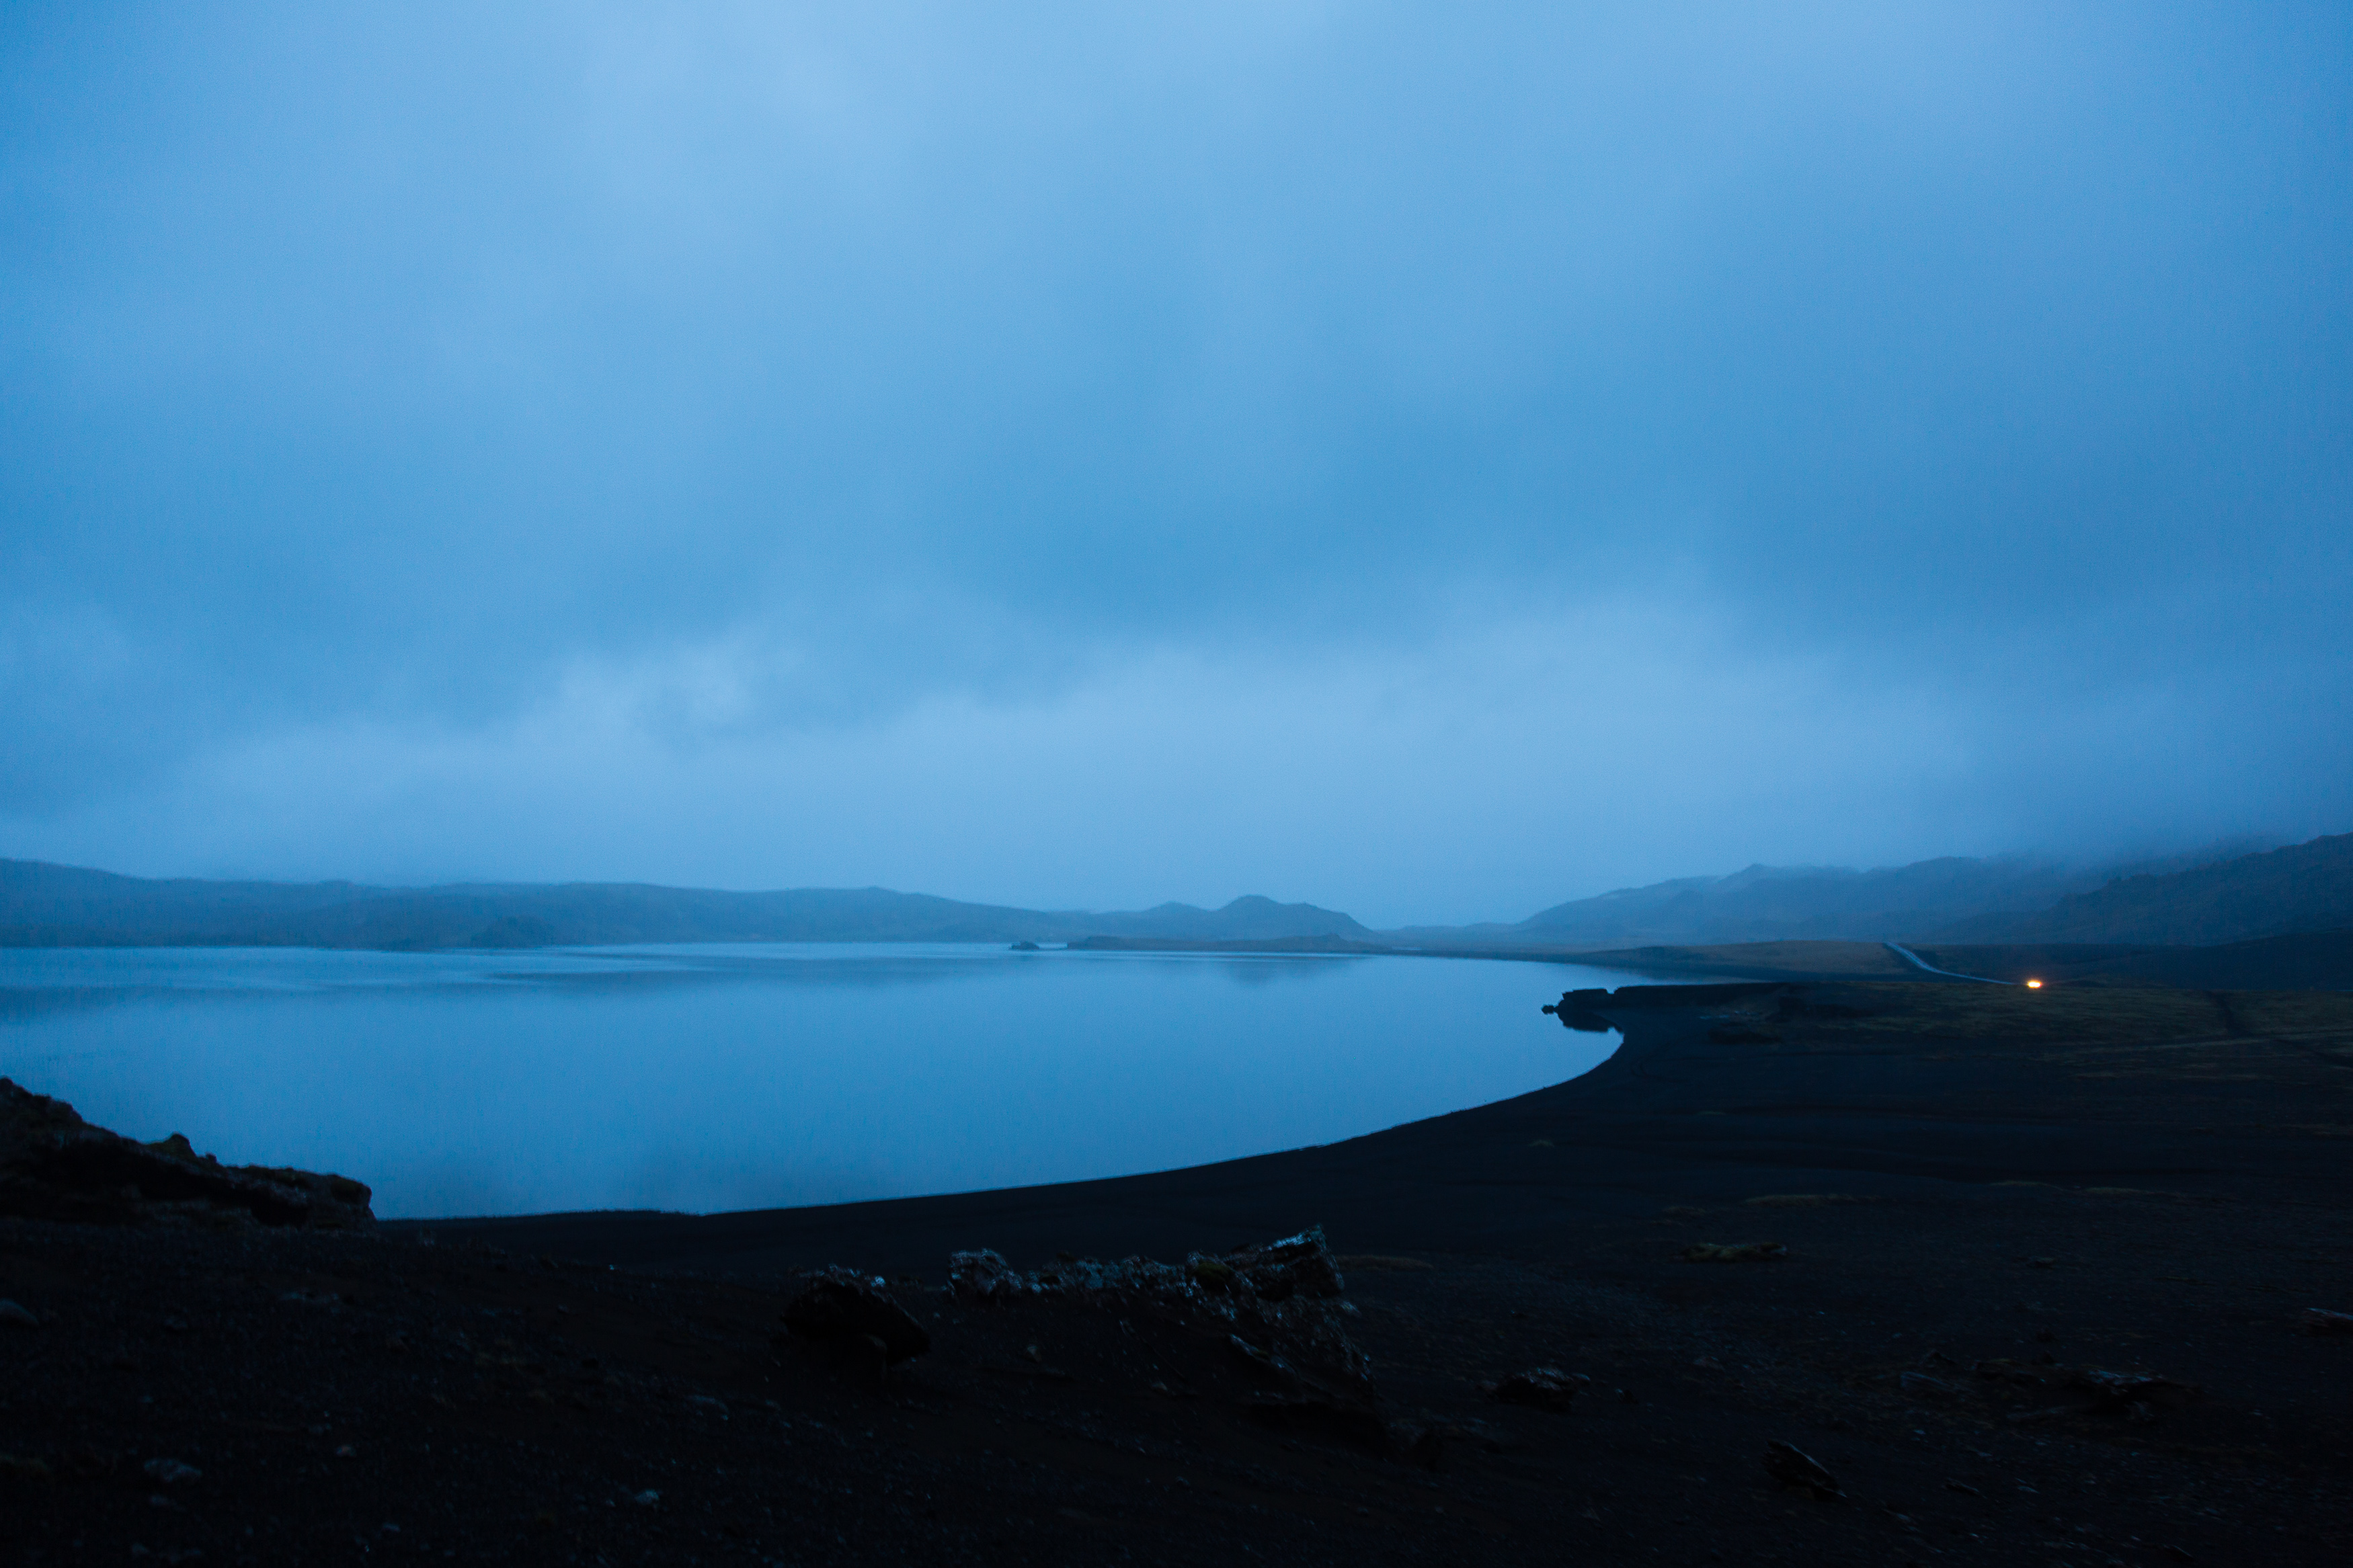
Getting to the volcano takes a lot longer than it needs to because the drive out from Reykjavik looks like this and you need to keep stopping to photograph it.
How to photograph a volcano
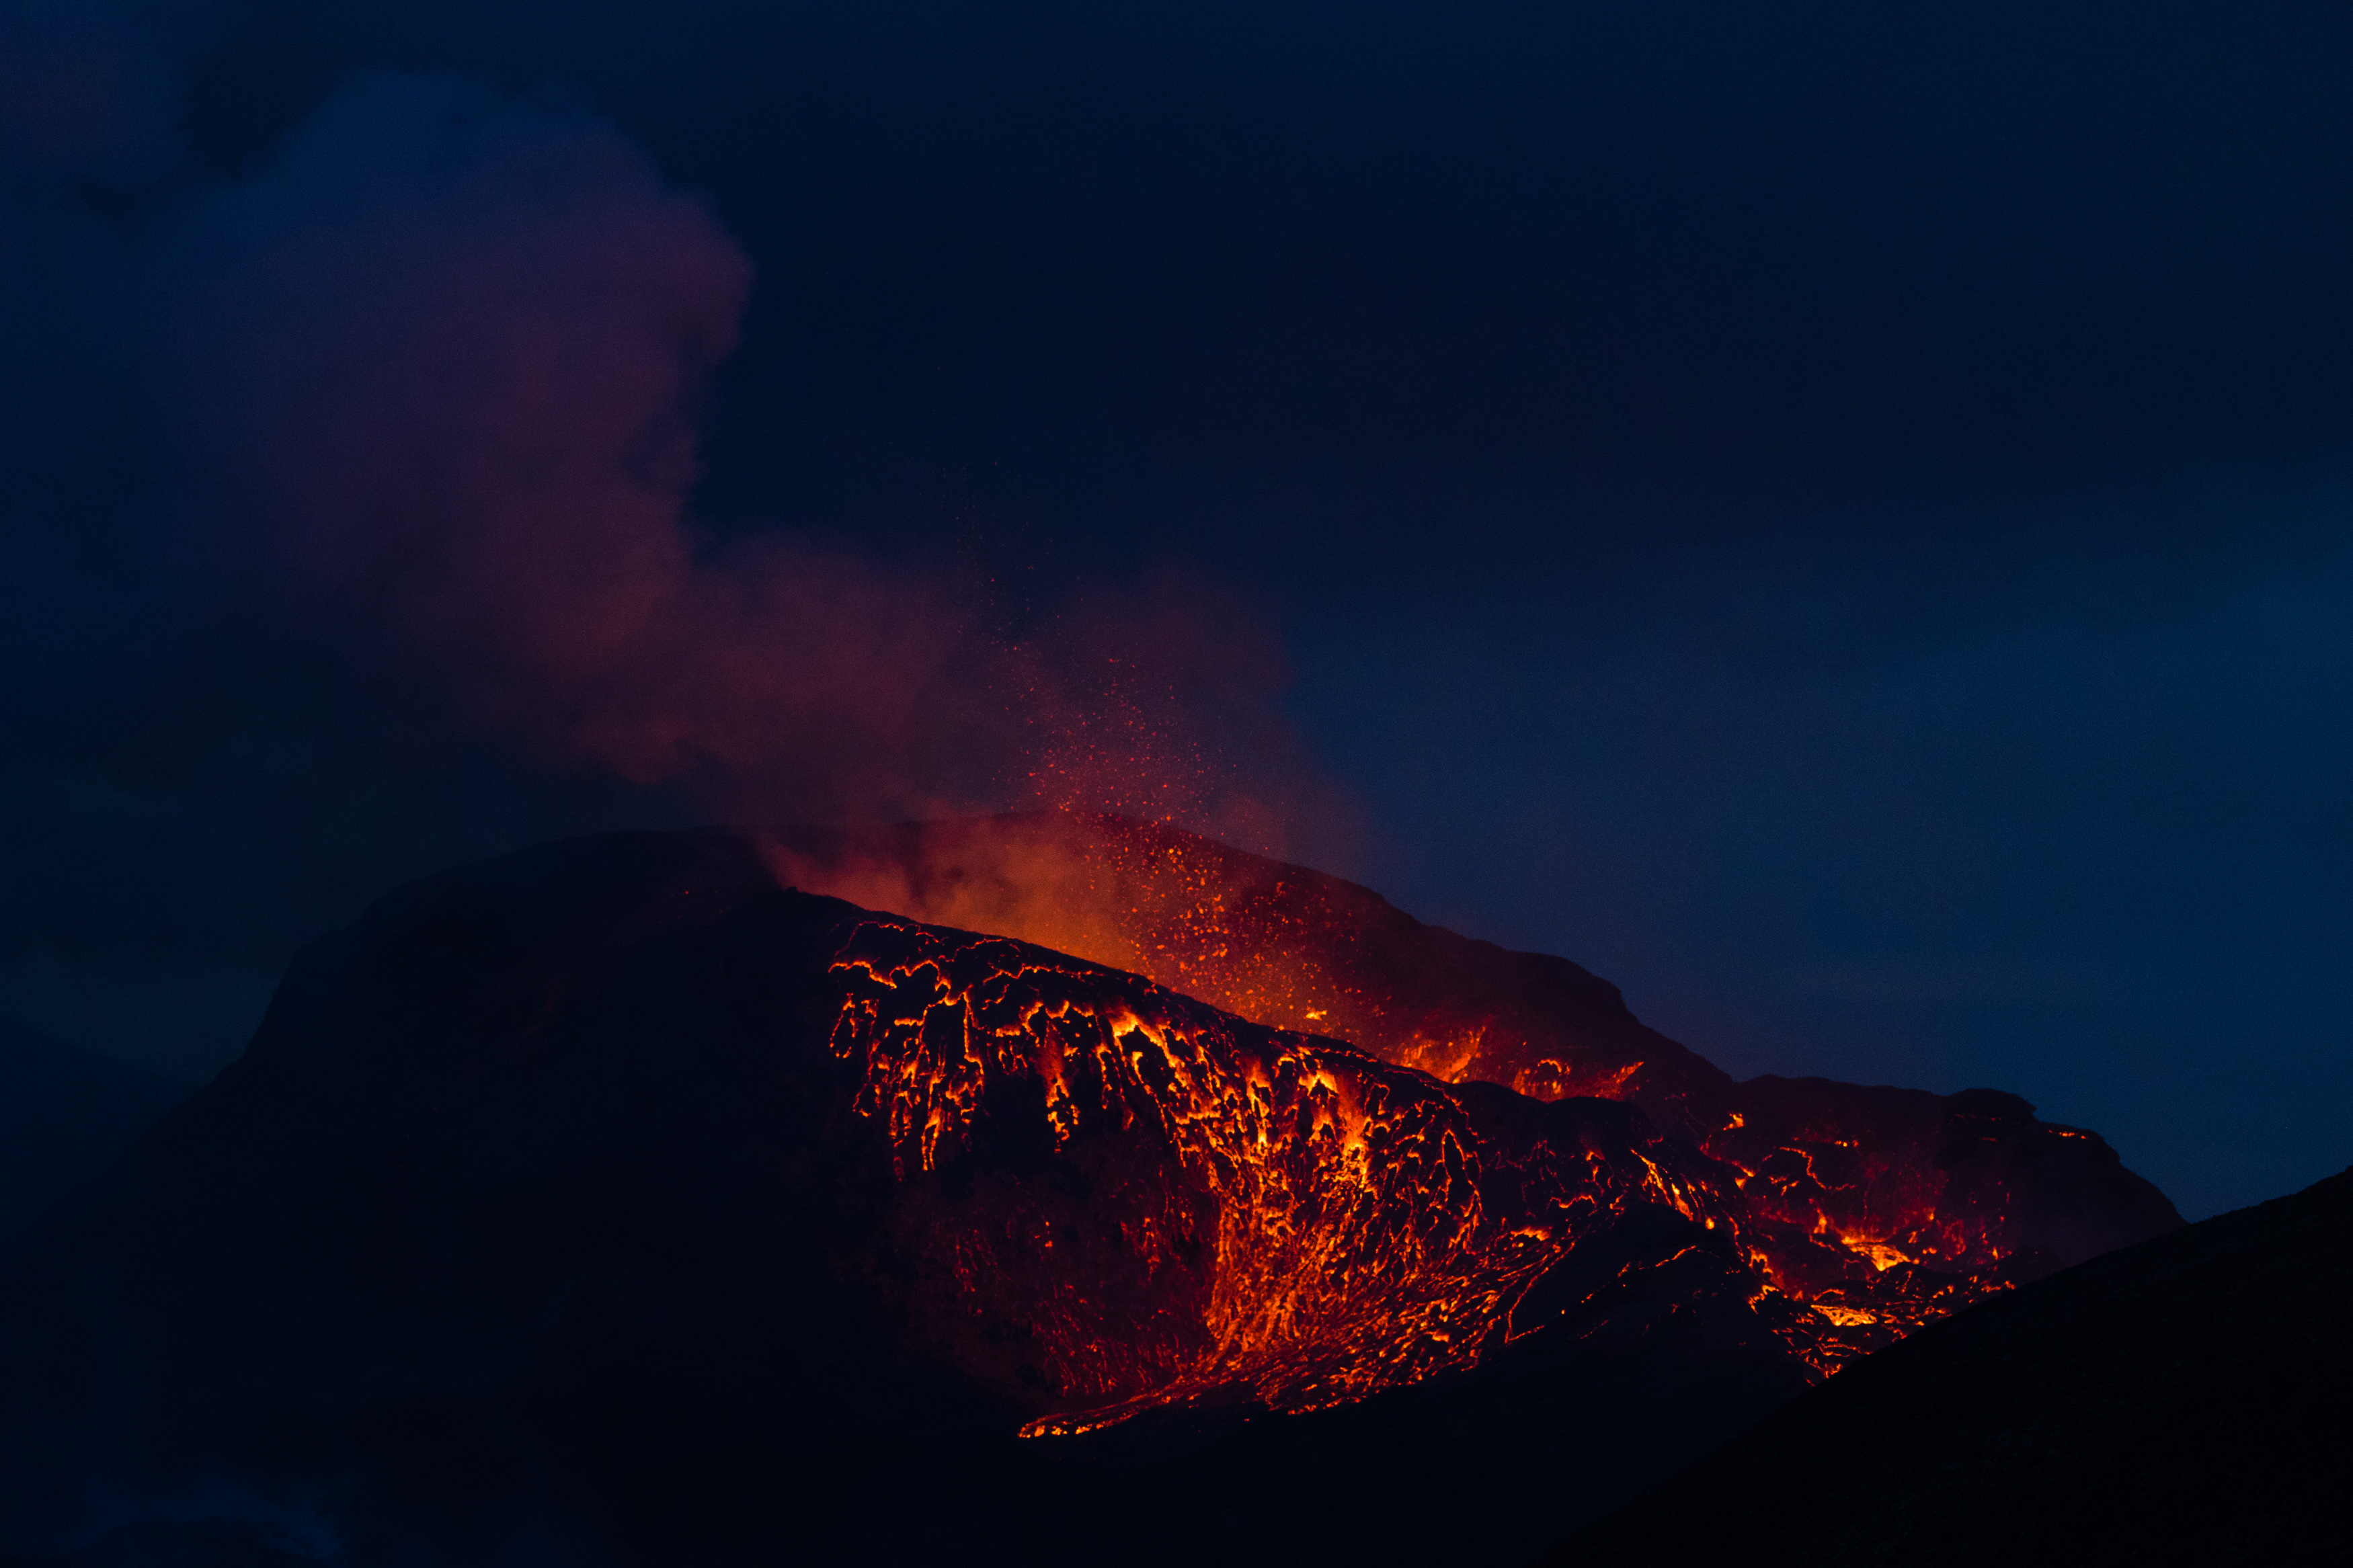
Photograph it before, during or after an eruption: you’ll struggle to take an unimpressive shot.
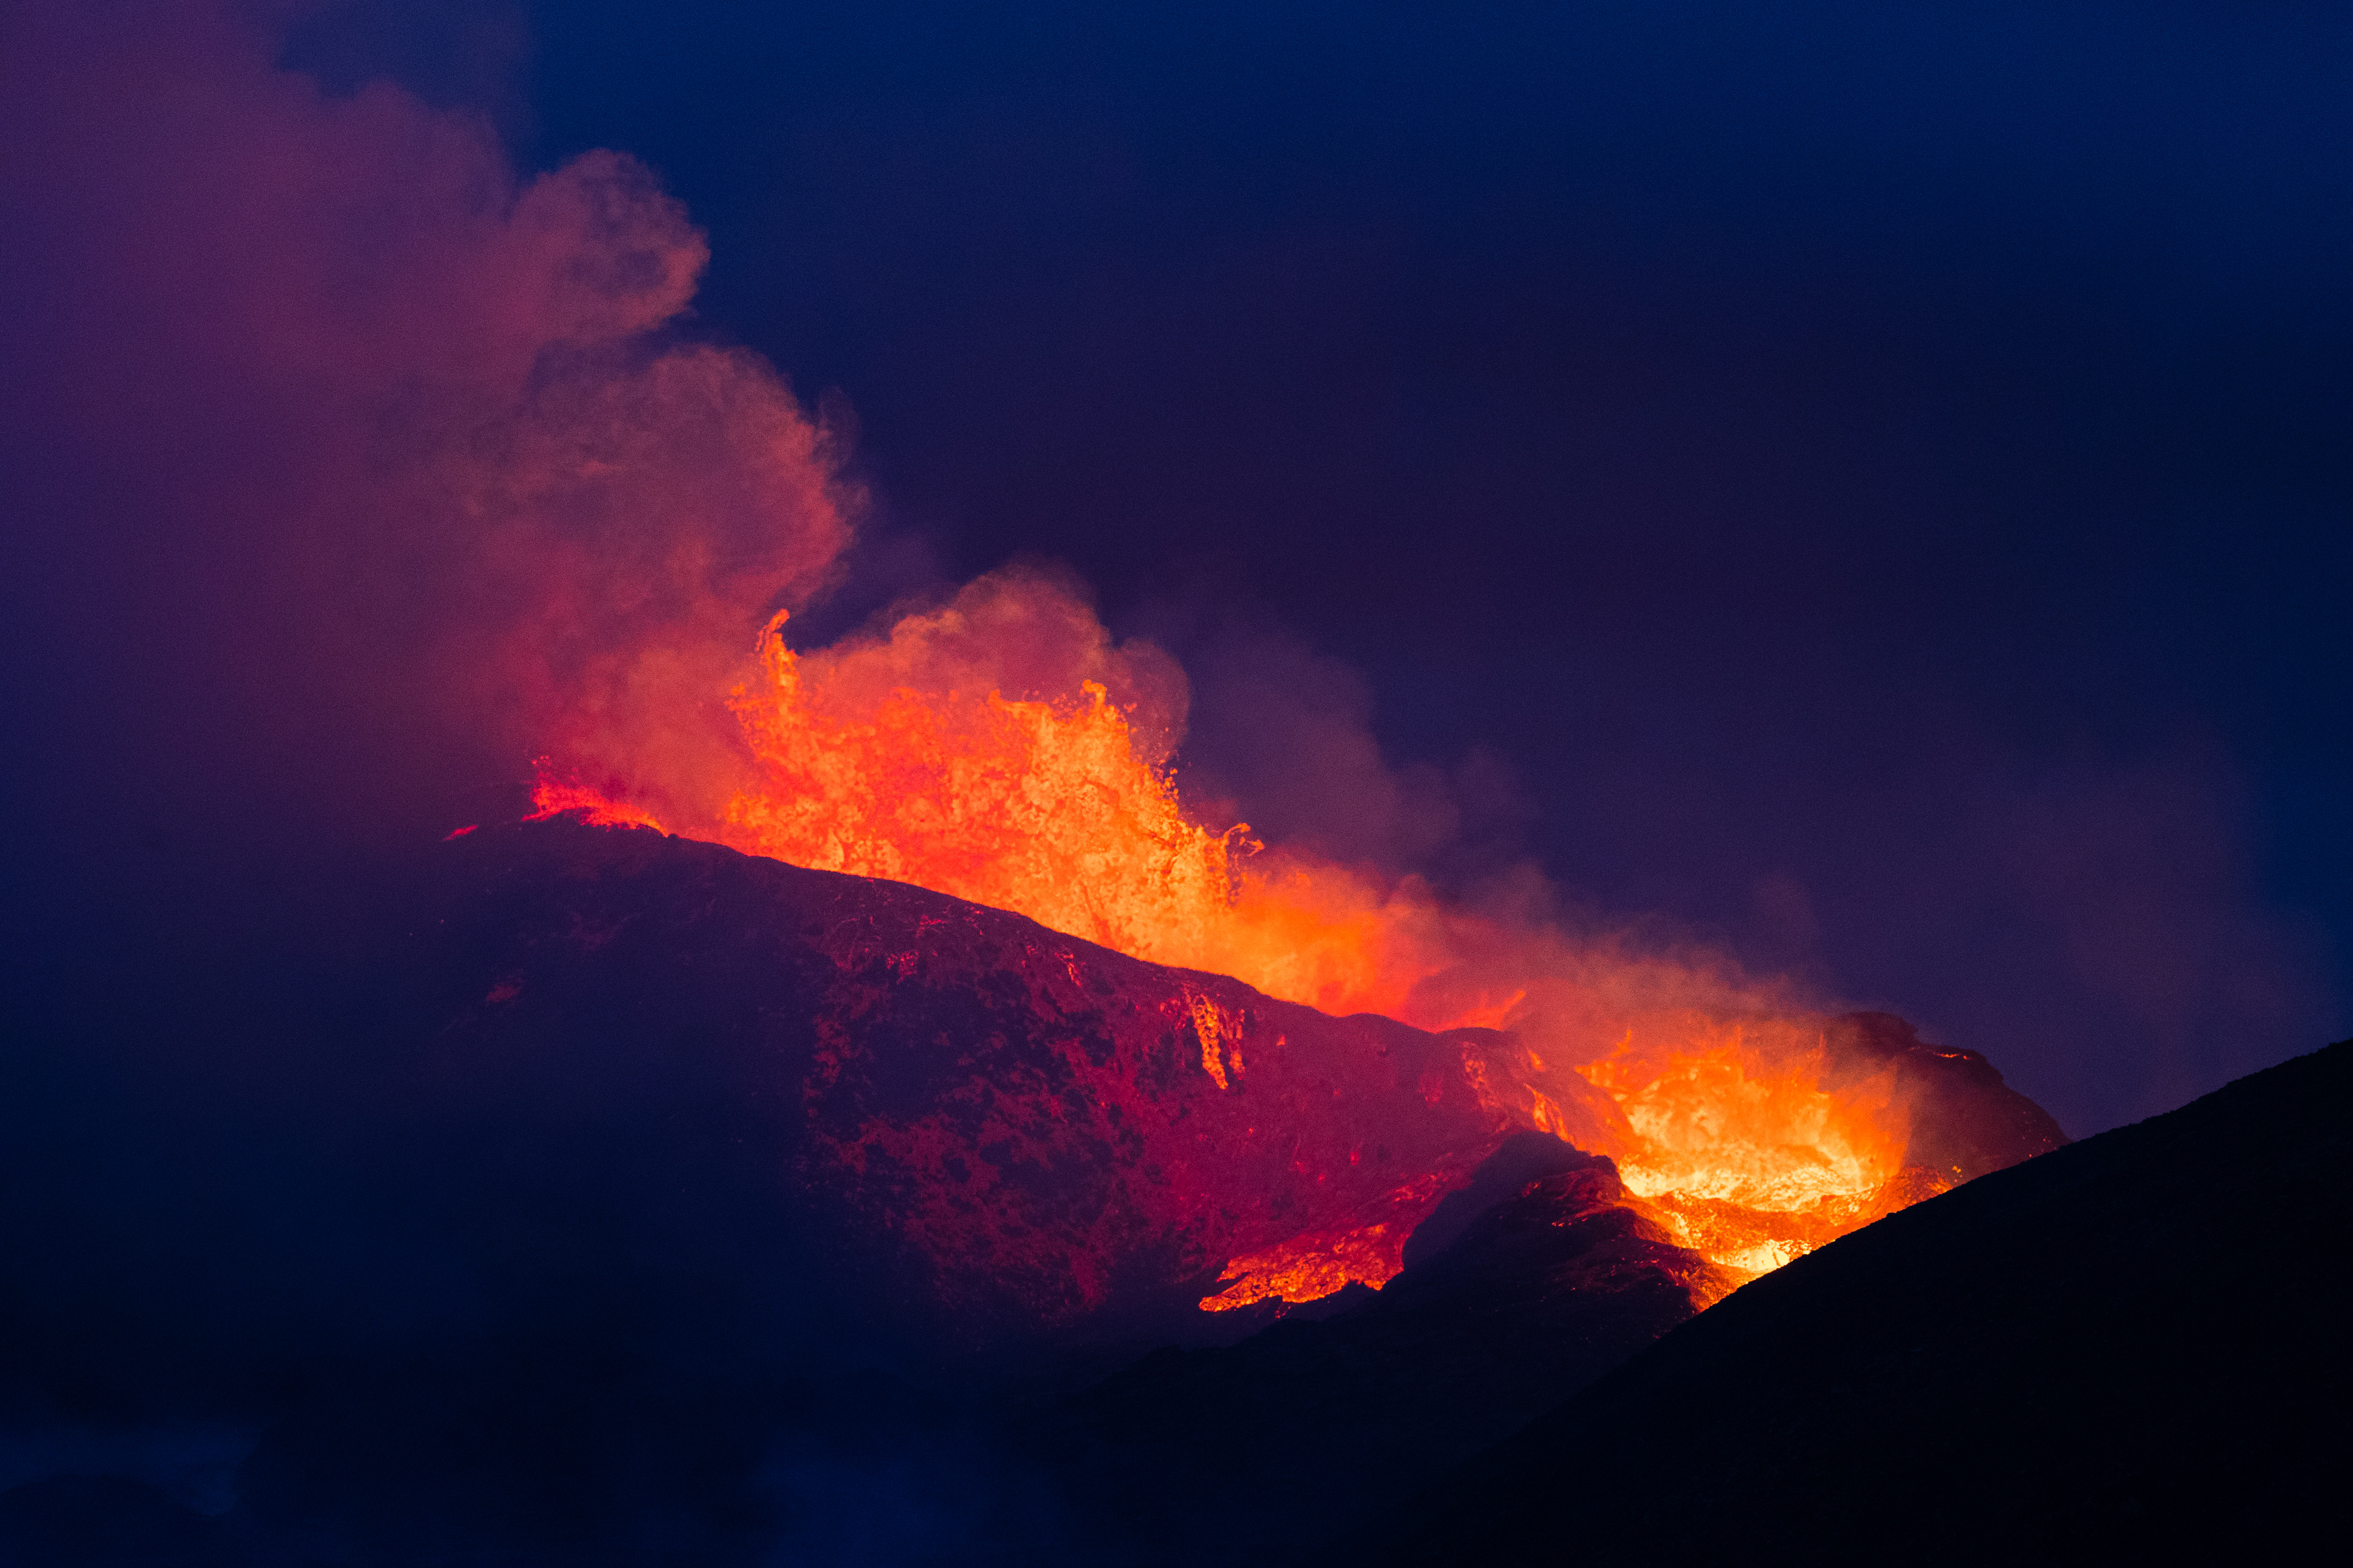
All of which brings us to the actual photography. People like to say “once-in-a-lifetime” about all kinds of photography, but the volcano was different every day I went, and since I came home has changed even more – paths I used have since been closed, places where I stood have been covered with lava. So, my first look at Geldingadalir was a genuinely once-in-a-lifetime. Watching molten rocks, heated to a thousand degrees, roaring down the hill towards you while the crater behind does a passable impression of an airliner leaving a runway and firing more lava hundreds of feet into the air was breath-taking. You could feel the heat from the volcano coming and going from hundreds of metres away. It was like it was breathing on you.
Photographing it was amazing. Most natural-world photography is comparatively straightforward – the light of the sun bounces off the scenery you want to photograph and, in most cases, that’s your exposure. With volcanoes it’s different – lava produces its own light, which gives you a huge amount of freedom in terms of how you expose the image. Expose for the ambient scenery and you get a reportage style image; expose for the lava, though and you can produce some really arresting images.
As ever, bystanders present plenty of reportage opportunities. News snappers will be relieved to hear there’s 4G at the volcano, allowing you to delight your picture desks without needing to get back to your hotel Wi-Fi.
The longer you watched, the easier it was to guess which part of the volcano was worth framing up on. This video gives a pretty good chronological feel for things – a big outflow of lava through the channel first, then a big eruption from the crater, then – my personal favourite – a few minutes where the whole crater glowed deep red as the newly ejected lava cooled on the outside. Between eruptions there were gaps of between four and eight minutes – enough time to shift position if you wanted, but with each eruption unpredictable in terms of size you could easily stay in the same spot for hours and not take the same image twice.
It’s not all about the eruptions, though – indeed, if you take the plunge and head to Geldingadalir now you’ll be lucky to see an eruption as the volcano’s cadence has changed dramatically. But I’m always interested in telling the whole story, so on my last night I headed into the Nátthagi, home at the time to a huge and rapidly advancing lava field.
The energy was totally different – less bombastic and explosive, more potent and foreboding. Nothing stops lava – in the days since I’ve watched the lava field overcome rocks the size of lorries – it’s expected that soon it will destroy the coastal road running from Grindavik to Ölfus, taking with it a fibre optic cable and a small farm.
Photographing the ever-advancing lava field presented just as many creative possibilities as the roaring eruptions coming from the crater just over the horizon. You could try to take in the whole thing on a wide-angle lens or – my favourite – get in as close as you dared to pull out some otherworldly hellscape abstracts. It also turned out that the slower-moving lava was just what the doctor ordered in terms of filming the volcano.
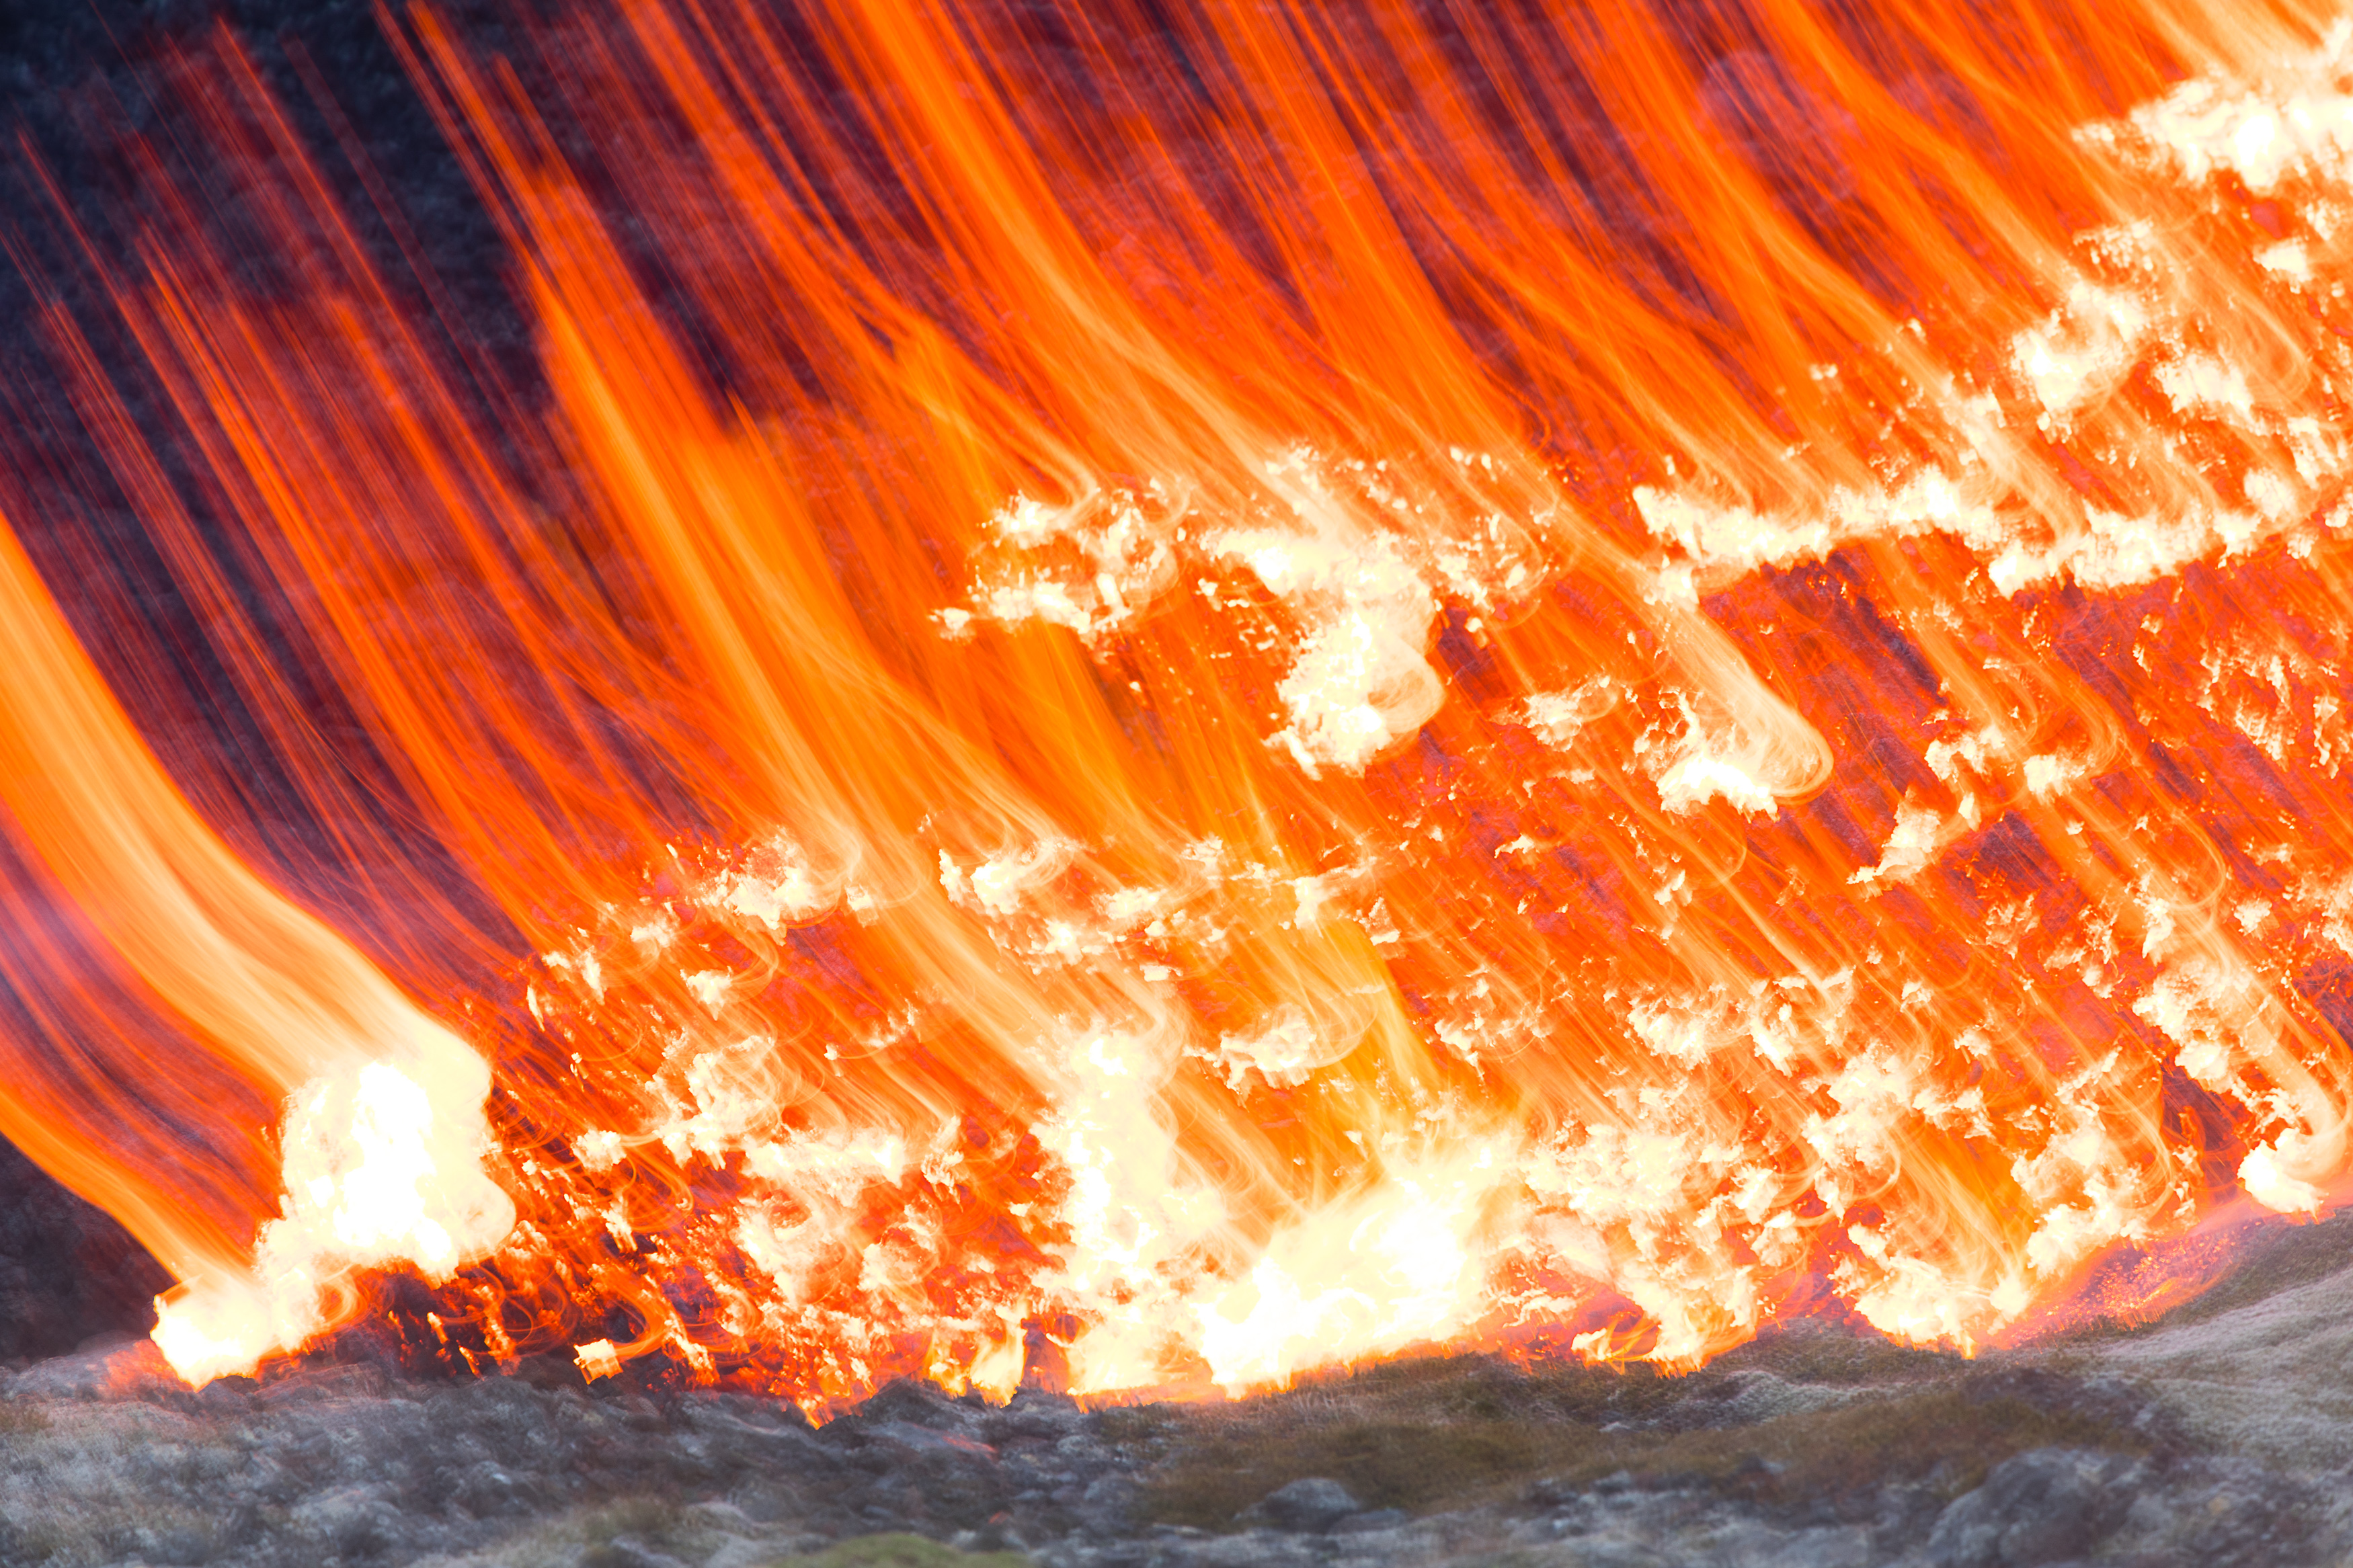
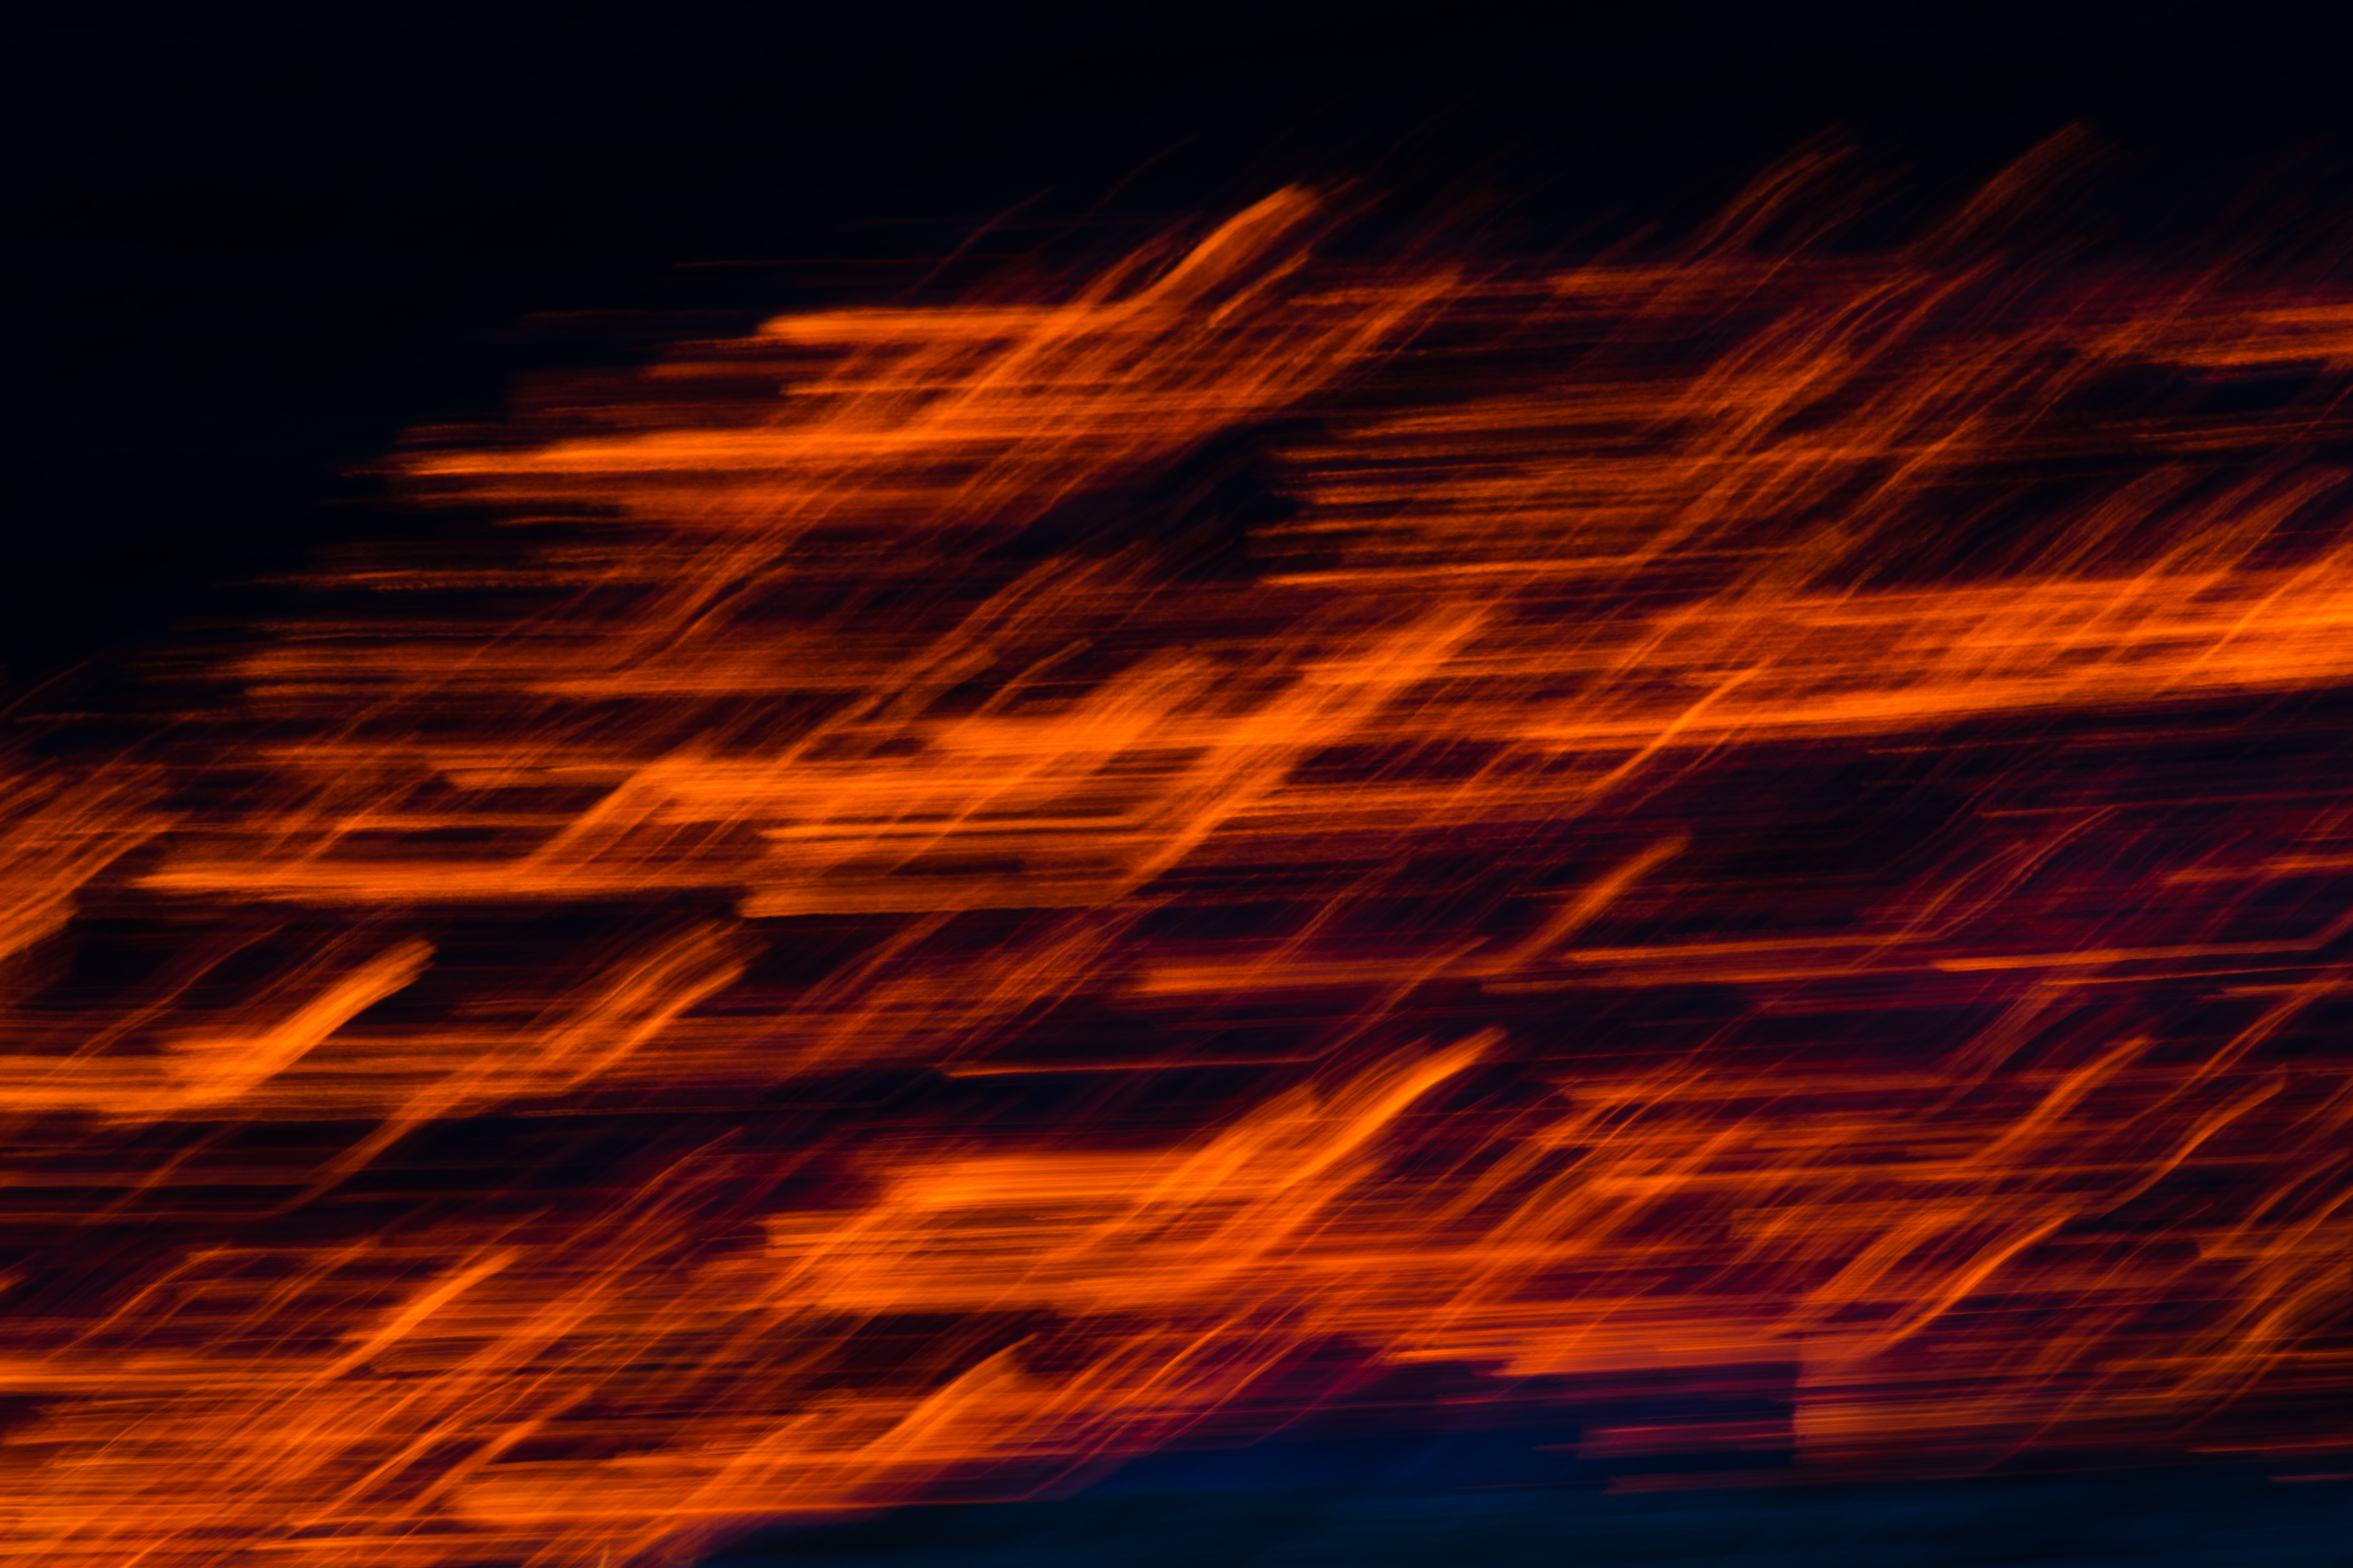
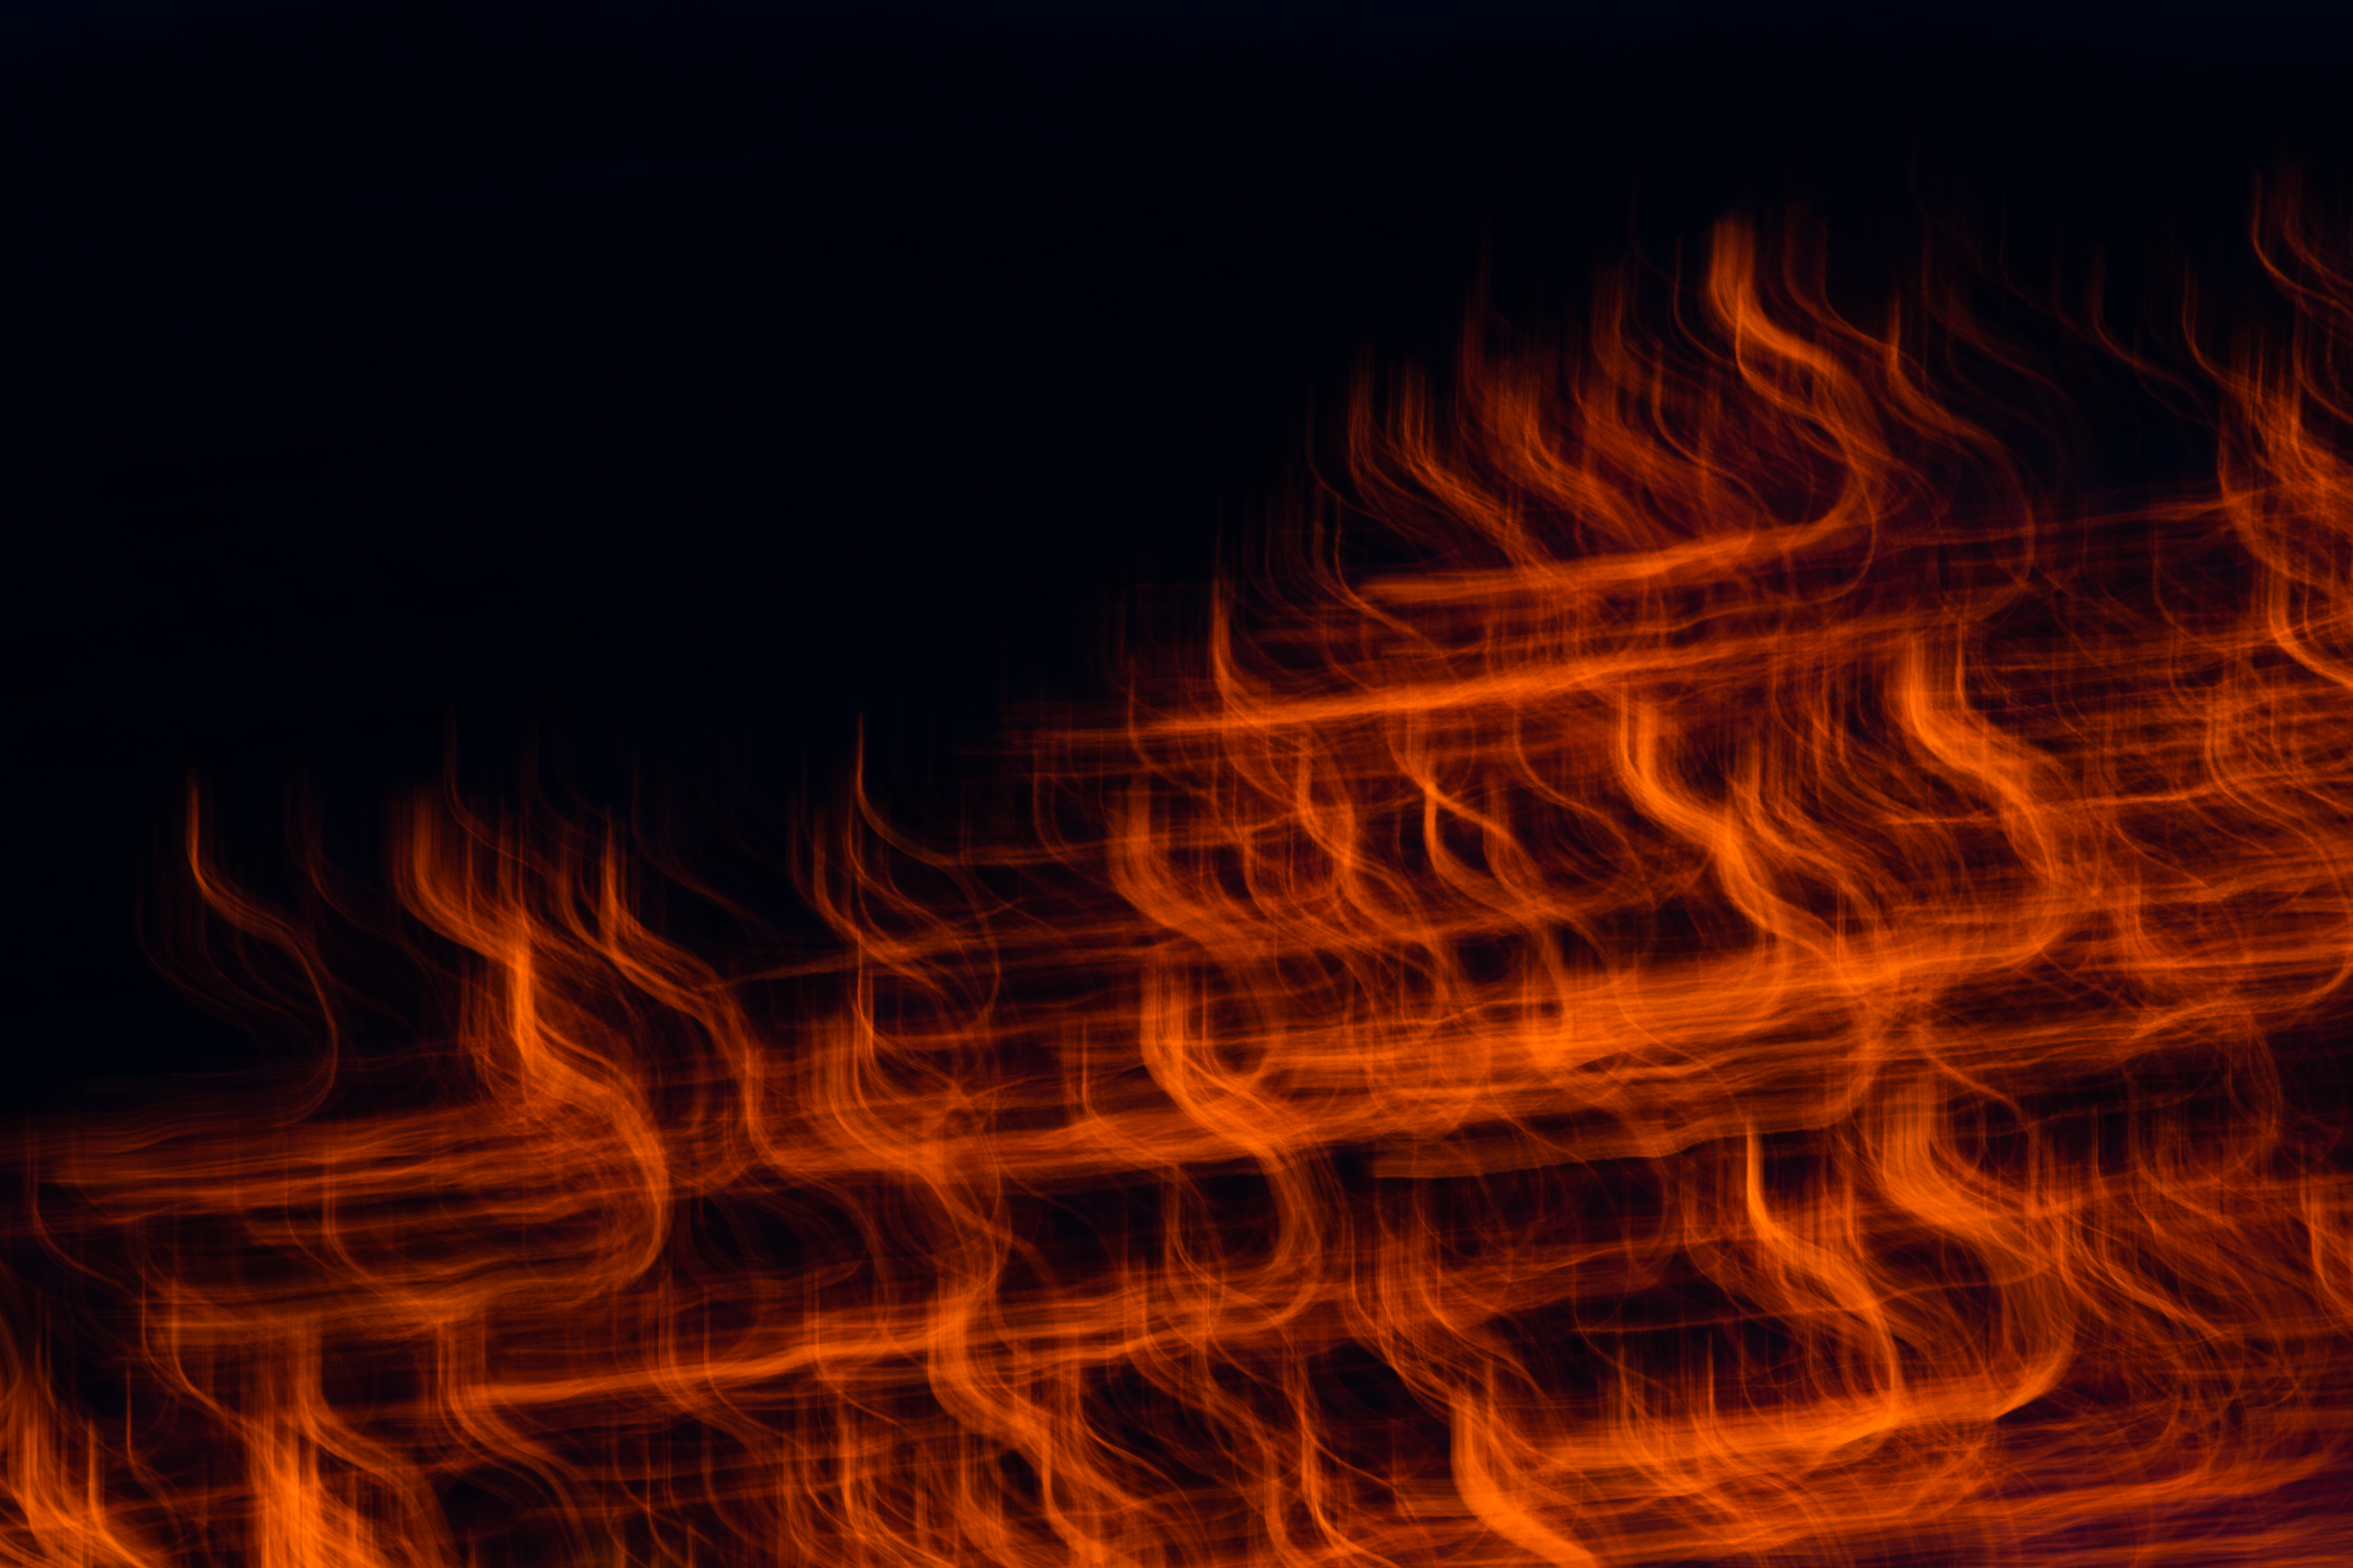
I also shot a few long exposures with a bit of intentional camera movement – I really like how these turned out. There’s something really graphical about them which I absolutely love.
Challenges
Challenges? I mean, there are some. Photographically the volcano is relatively easy – most of the time you won’t really be stretching for really high ISOs, and if you can spot-meter accurately you should be able to get some really varied images. Heat haze was a constant problem – when you’re shooting the volcano crater, you’re almost always shooting over the top of maybe 100 metres of lava, sometimes more, which is generating a furious amount of heat haze. Catching focus through that was often really difficult, and made getting really sharp images occasionally very frustrating. I found varying my position was helpful, although this meant I ended up walking an average of eight miles each time I went to the volcano.
Which brings us to the next big challenge – how long you can endure being hunkered down on the side of a mountain in whatever weather Iceland cares to throw at you. Forget the warm days we’re enjoying in northern Europe – Grindavik averages about 10°C in the middle of summer, and because the volcano is currently creating its own micro-climate, it’s frequently much, much colder. Add a rain component and you need to be absolutely sure that you’re as wind, rain and cold-proof as possible. If you have any doubts about the quality of your hiking gear, Iceland will put them to rest one way or another.
You’ll also need to be prepared for some late nights – although I’ve seen plenty of good mid-day images from the volcano, the most spectacular-looking images were all shot in the strange half-light of an Icelandic summer evening. The lava glows against the black lava fields and deep blue skies, so expect to be leaving the volcano at perhaps midnight, with still an hour’s walk between the mountain and your car. The last thing you want is to miss a good-size eruption because you can’t hack the climate.
Dave’s favourite shot
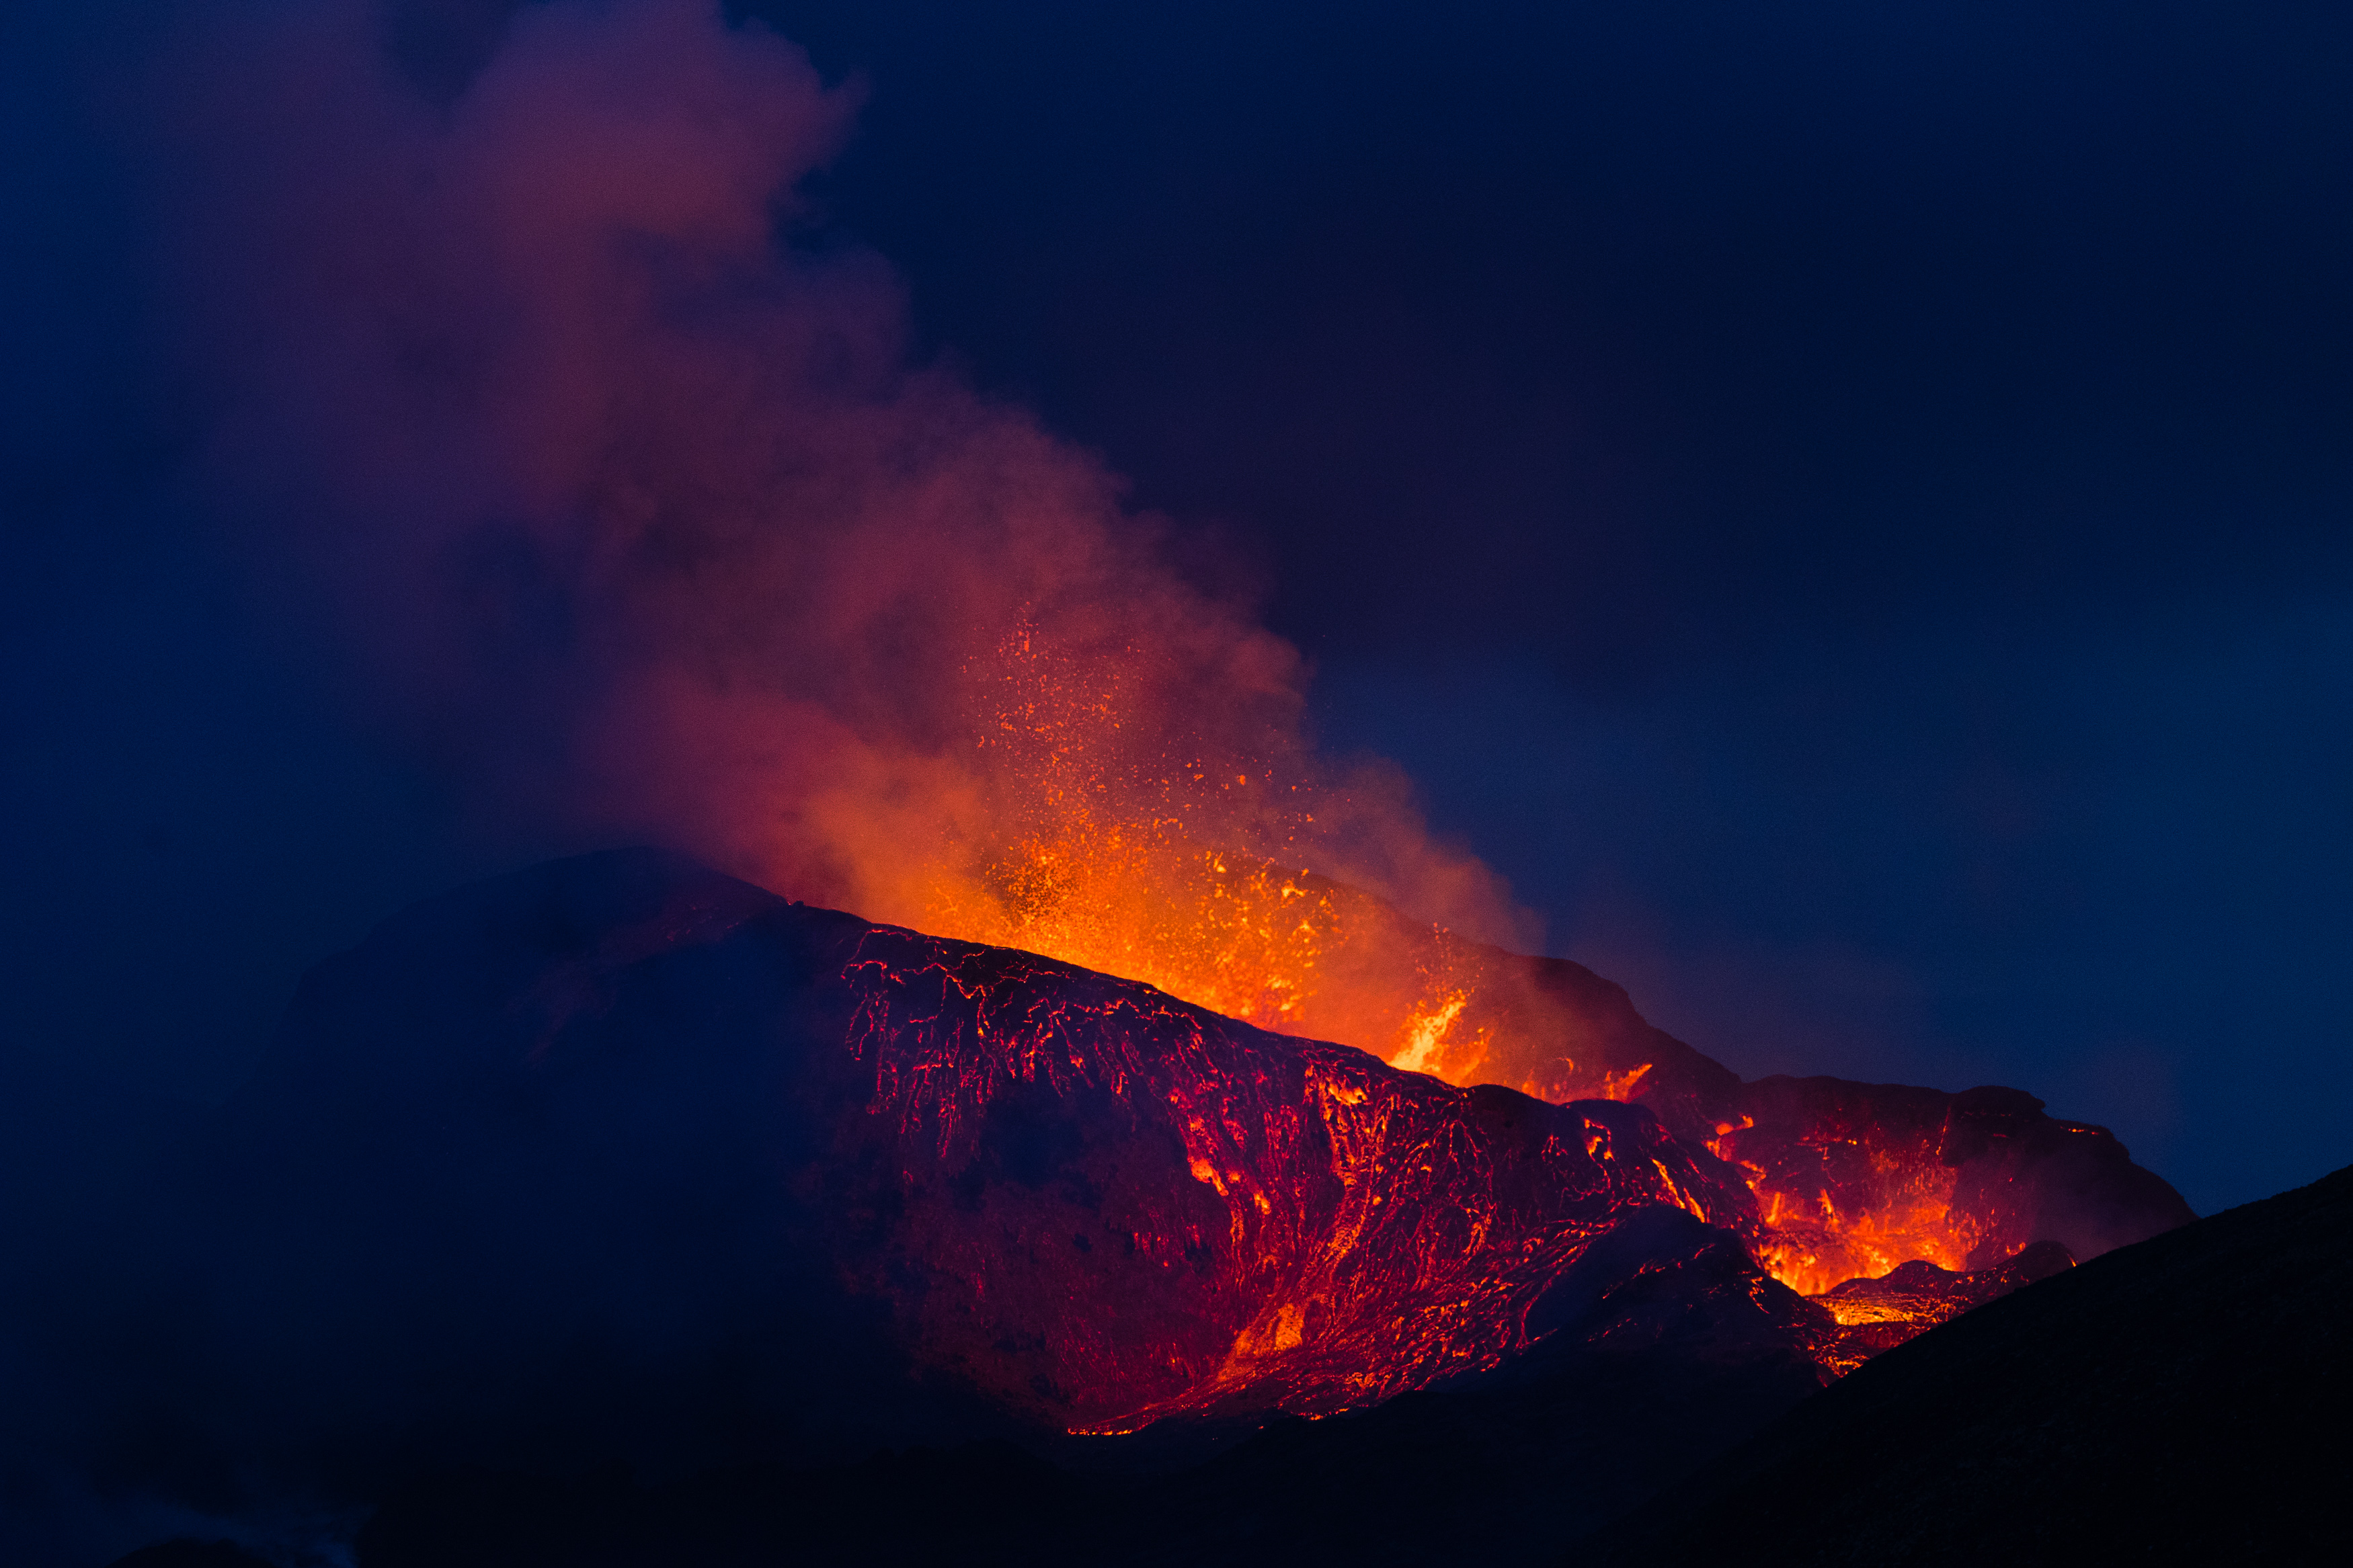
This moody, ominous-feeling image is my favourite of the shoot, although it must be said there’s plenty of competition for the top spot.
Shot at a moderate focal length of just 135mm, this is confirmation that a super-telephoto zoom was the right lens to bring. A shutter speed of 1/640th and a relatively whopping ISO of 2,500 has produced a steady exposure and nicely stopped the small lava explosion at the bottom right of the crater from smearing across the frame. I think the EOS R6 shoots absolutely lovely photos at what might have been untouchable ISOs on other camera bodies. The aperture was set at f/7.1 – nice and sharp, but more because I didn’t want the aperture and exposure to change as I changed focal length.
There’s some good timing going on with this frame. Obviously the temptation is to shoot the volcano when it’s at its most kinetic – firing lava into the sky – and obviously I have plenty of those. But wait just a few seconds and the crater looks totally different – covered in rapidly cooling lava from its most recent eruption, it looks less like a planetary-scale firework and more like what it is – a brooding, dangerous new entrance to our home at its most elemental. There are a still a few after-eruption sparks of lava to give the frame a bit of energy.
It was a fun exposure to judge – a quick look at the EXIF data tells me this was shot at quarter to midnight, so although there was still a bit of ambient light, there wasn’t much. So I’ve exposed for the lava, and the blue-hour sky behind offers a bit of a counterpoint. I’ve allowed the blacks in the foreground to crush into nothing, and the result has a bit of a glow on it that I love. I subsequently gave this picture the Giclée treatment with some help from the folk at theprintspace and I have to say it looks even better as a print.
Should you go?
Yes. Unequivocally. Geldingadalir is no longer belching out eruptions every five or six minutes, so if you want the pyrotechnics you should be prepared to wait for some time – perhaps hours – to get a good one. There is some evidence from some of my favourite Icelandic YouTubers that the eruptions, when they do come, are bigger than ever, which in my book makes them worth waiting for.
Even if you don’t catch any big eruptions there’s still plenty of lava to shoot, and even if you make a total hash of it you’ll still be – epoch-wise – among the very first humans to see a brand-new geological feature that will outlive the next several generations. It’s big, it’s loud, it’s pretty dangerous, which in my book is everything adventure photography should be. I blame Alister for my adventure; you can always blame me.
Dave Stevenson
Dave Stevenson is a location, nature and behind-the-scenes stills photographer, based in the UK.